> ## Documentation Index
> Fetch the complete documentation index at: https://docs.autosend.com/llms.txt
> Use this file to discover all available pages before exploring further.
# API Keys
> All API requests to AutoSend must be authenticated using an API key. This guide covers the two types of API keys, how to create them, and how to use them.
export const AUTOSEND_PATHS = {
dashboard: 'https://autosend.com/dashboard',
apiKey: 'https://autosend.com/account/api-key',
faqs: 'https://autosend.com/faq',
marketingEmails: 'https://autosend.com/marketing-emails',
webhooks: 'https://autosend.com/webhooks',
composeByAutoSend: 'https://autosend.com/compose',
emailActivity: 'https://autosend.com/email-activities',
team: 'https://autosend.com/settings/team',
pricing: 'https://autosend.com/pricing',
verifyEmail: 'https://autosend.com/compose/email-builder?template=verify-email',
welcomeEmail: 'https://autosend.com/compose/email-builder?template=welcome-email',
productUpdate: 'https://autosend.com/compose/email-builder?template=product-update',
newsletter: 'https://autosend.com/compose/email-builder?template=newsletter',
automations: 'https://autosend.com/automations',
globalSuppressions: 'https://autosend.com/suppressions/global',
signup: 'https://autosend.com/signup',
domains: 'https://autosend.com/settings/domains',
smtpKey: 'https://autosend.com/settings/smtp',
logoKit: 'https://asend.email/logo',
contactsPage: 'https://autosend.com/contacts/list-and-segments',
accountBilling: 'https://autosend.com/account/billing',
accountUsage: 'https://autosend.com/account/usage',
terms: 'https://autosend.com/legal/terms',
inbound: 'https://autosend.com/email-activities/inbound'
};
## Overview
AutoSend uses **API Key authentication** with Bearer tokens. Every API request must include your API key in the `Authorization` header. AutoSend has two types of API keys, each with different scope and purpose.
## Key Types
* **Project API Key** (`AS_...`): Scoped to a single project. Use this for sending emails, managing contacts, templates, campaigns, and all day-to-day operations. This is the right choice for most integrations.
* **Account API Key** (`ASA_...`): Cross-project scope. Use this when you need to programmatically create, update, or delete projects - for example, when building a multi-tenant platform. All requests made with an Account API Key require an `x-project-id` header to specify the target project, except when creating a new project.
## Creating an API Key
Go to **Account > API Keys** from the sidebar. Click the **"Generate Key"** button.
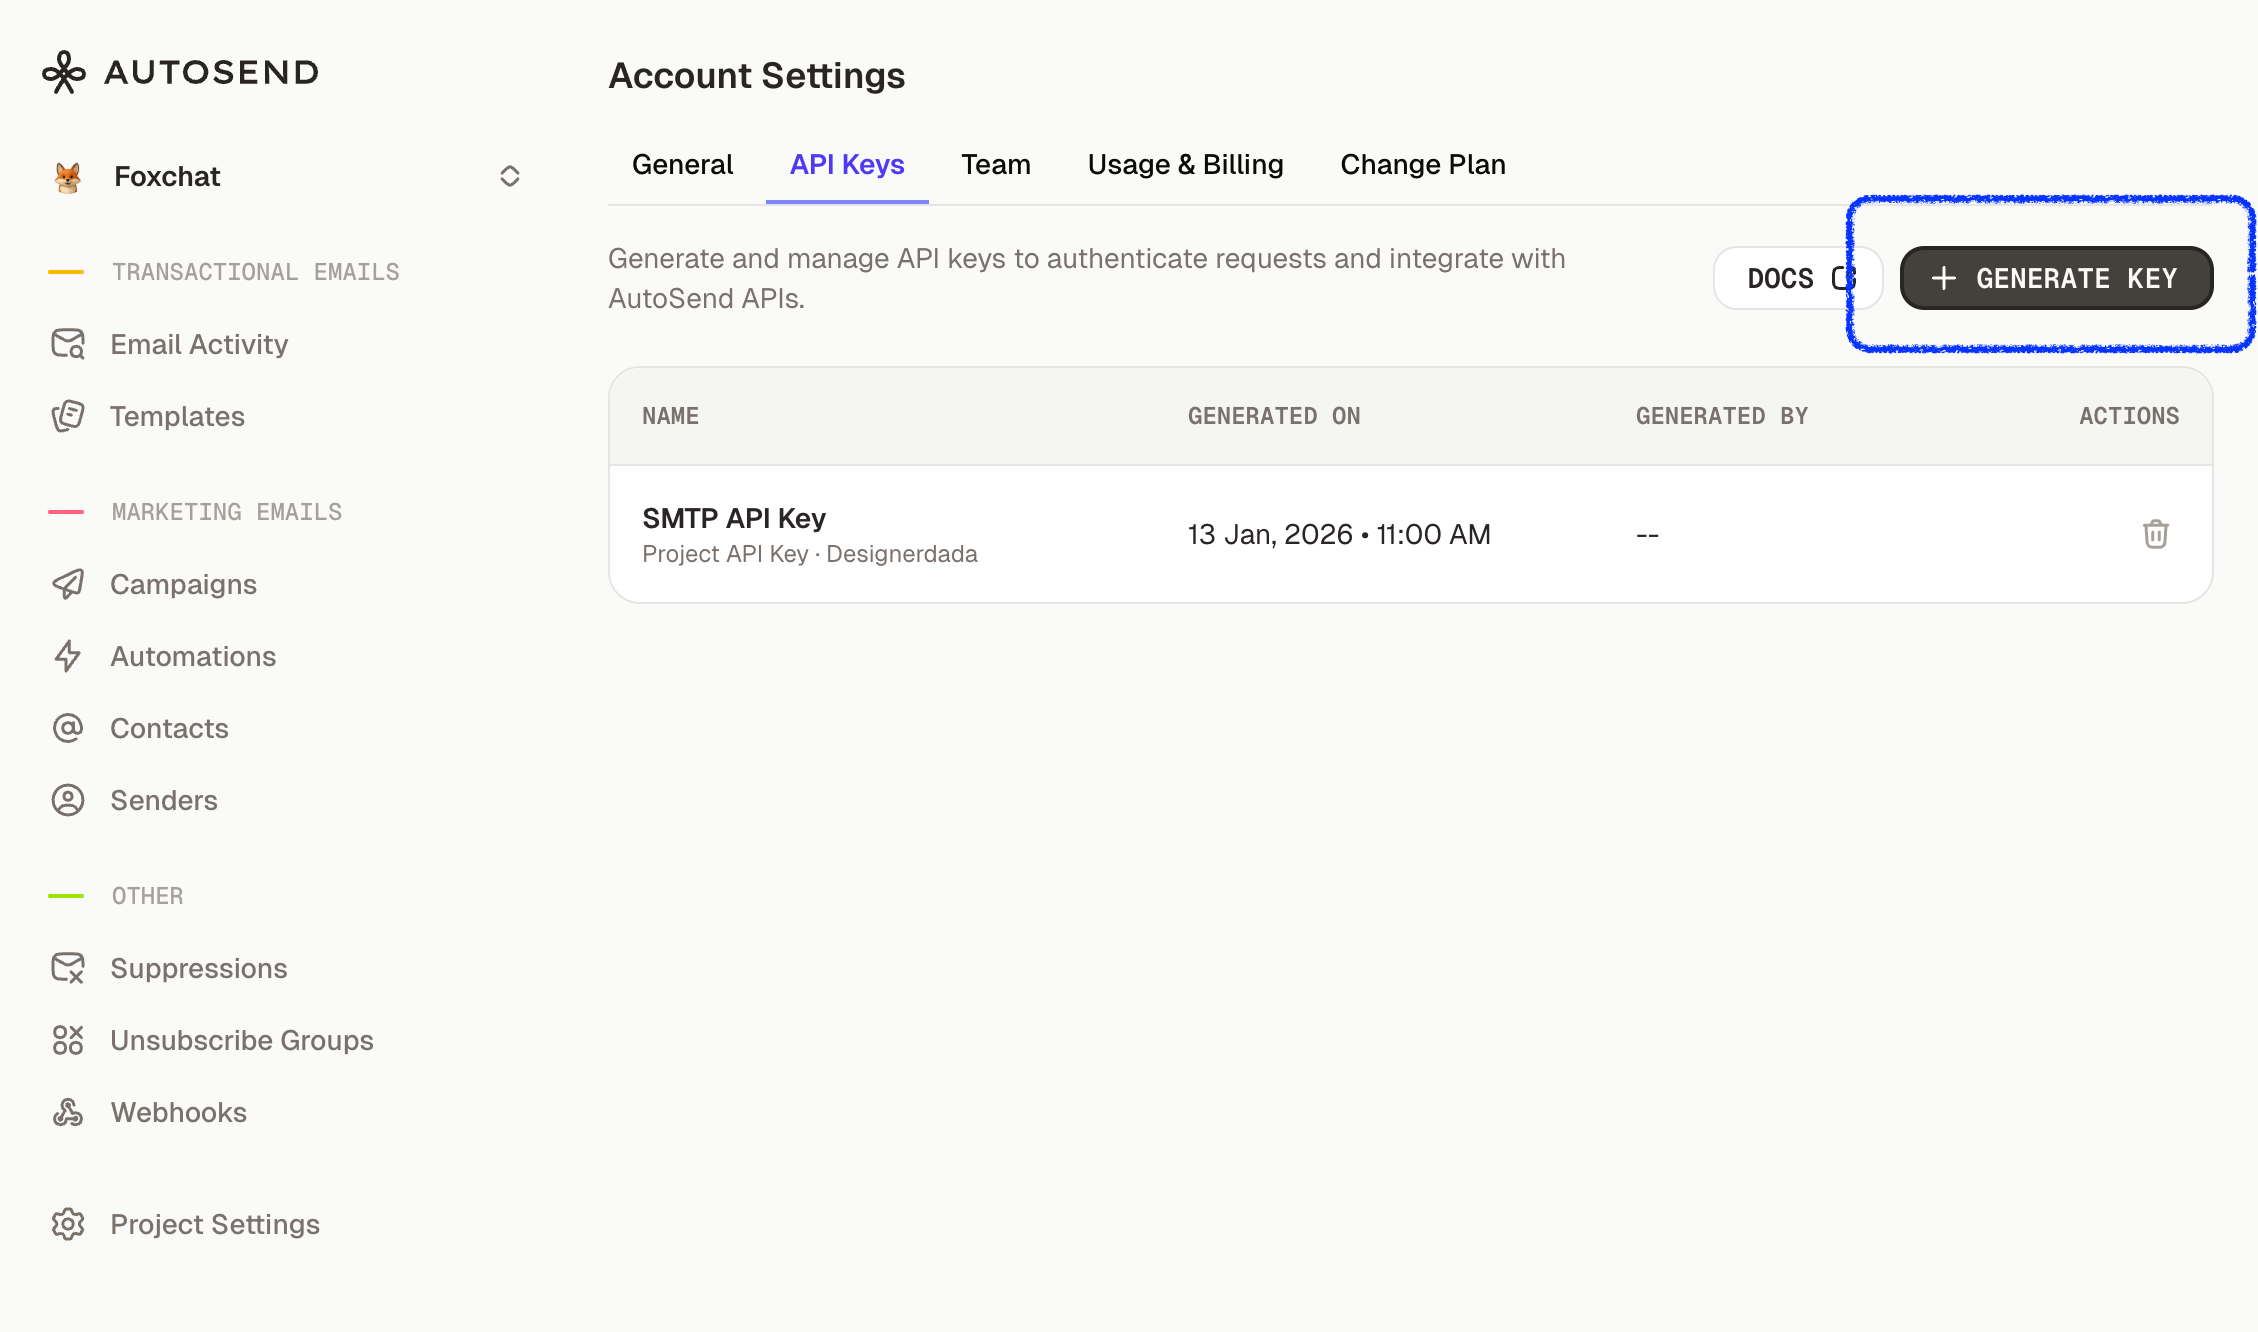 A modal will open where you:
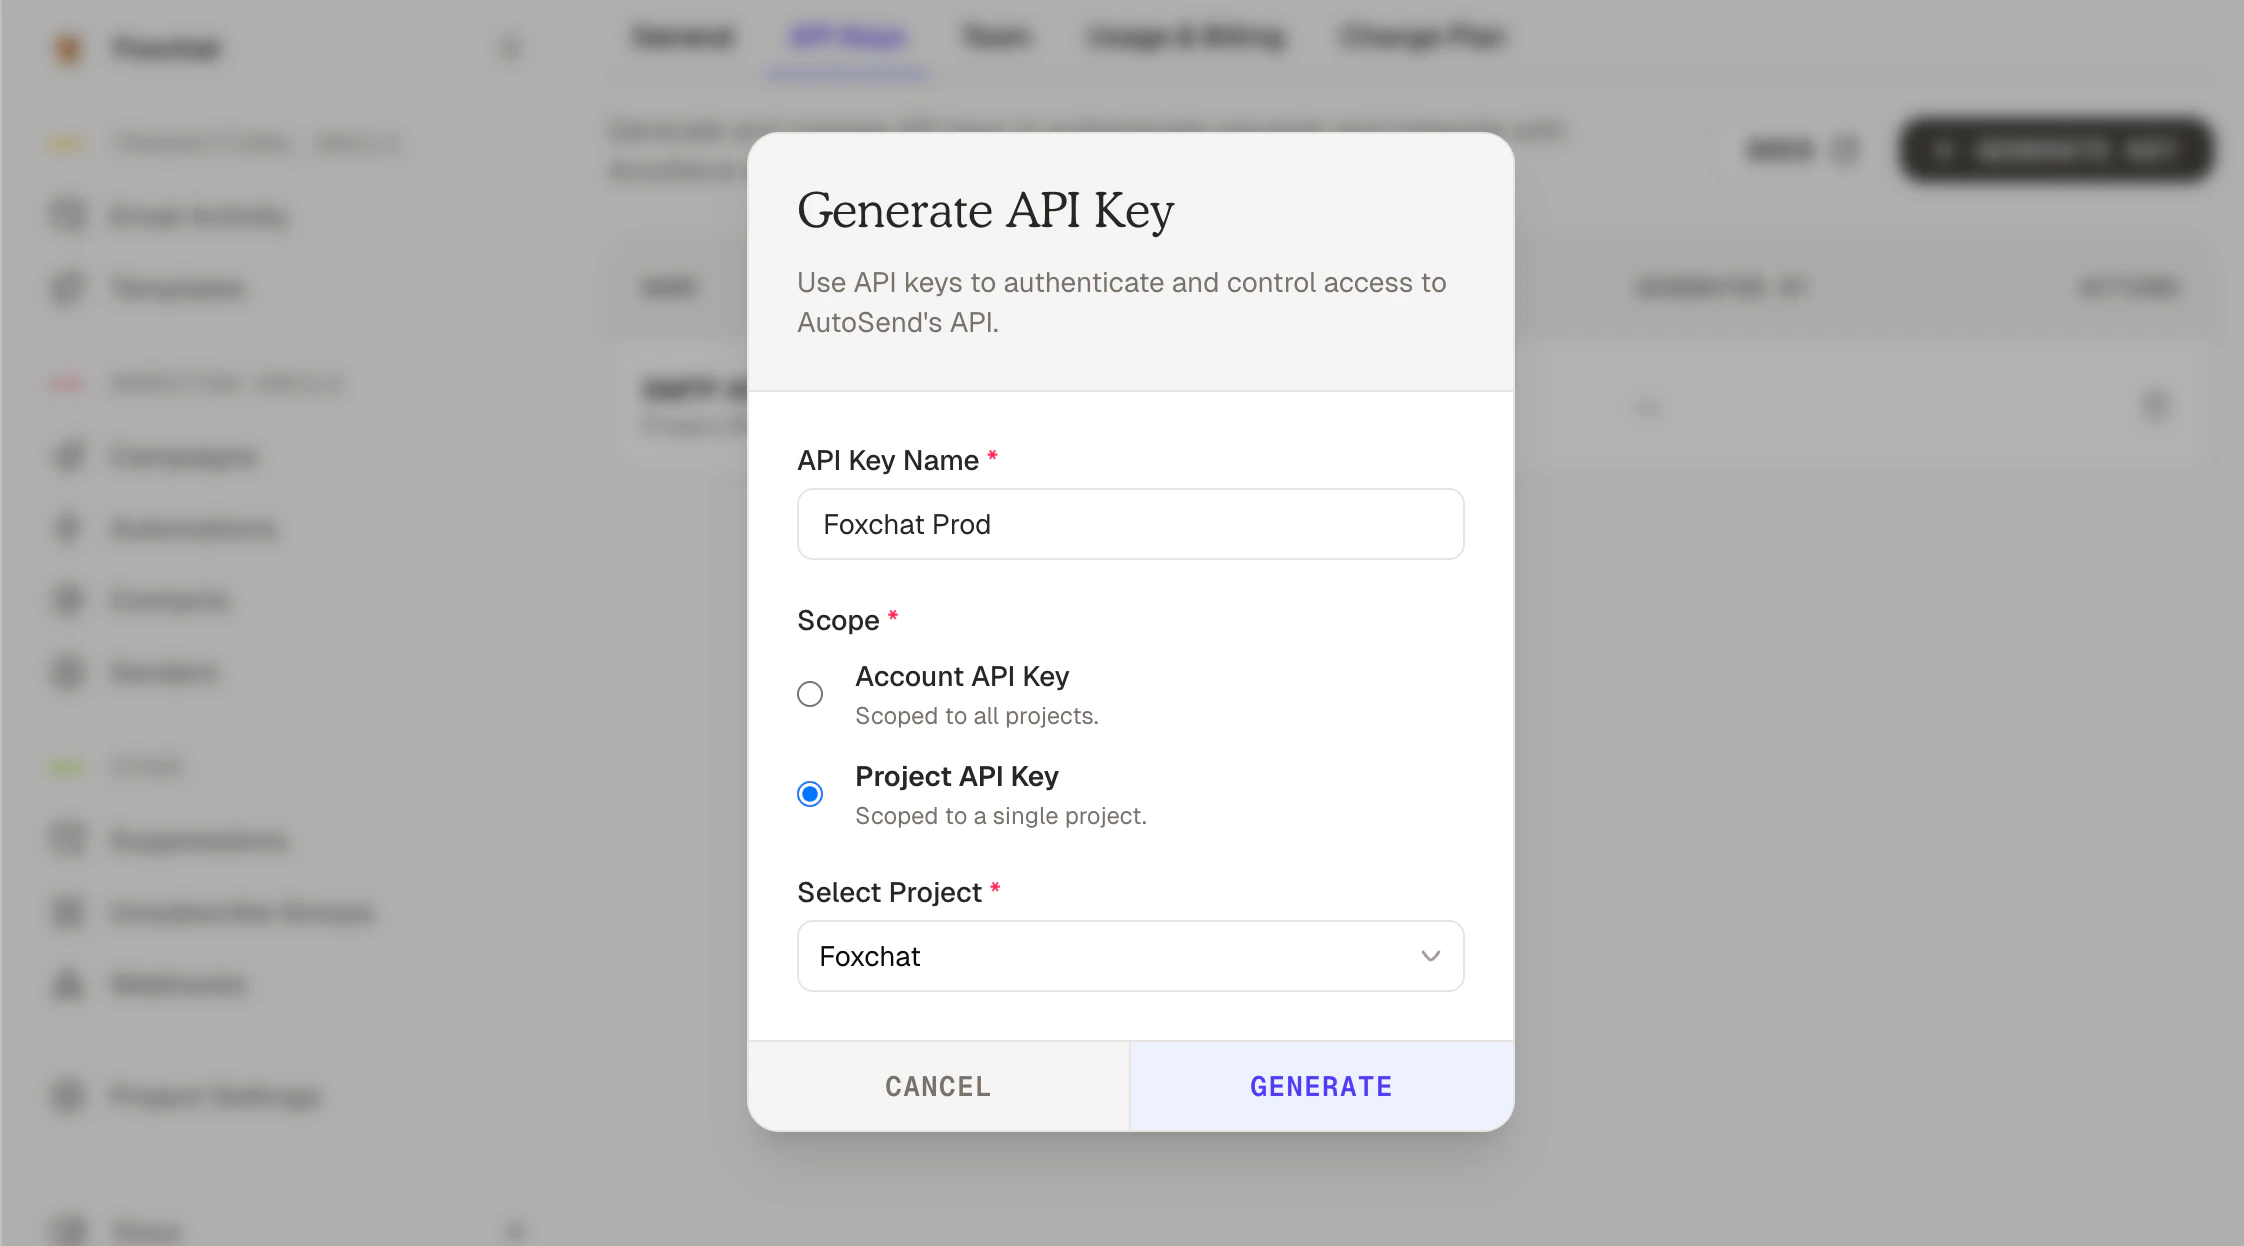 1. Enter a descriptive name (e.g. `Production`, `Staging`, `Multi-tenant Service`)
2. Select the key type: **Account API Key** or **Project API Key**
3. If you selected **Project API Key**: choose which project this key belongs to
Click **"Generate"**.
After generation, your **API Key Secret** is shown once:
For security reasons, the API key secret is only shown once during creation. You will NOT be able to view it again.
* Copy the key immediately to your clipboard
* Store it securely in a password manager or secrets vault
* Download the .txt file as a backup
* Never commit API keys to version control
* Never share your API key publicly or in client-side code
## API Key Formats
AutoSend API keys follow these formats depending on the type:
```
ASA_[secret_string] ← Account API Key
AS_[secret_string] ← Project API Key
```
* **`ASA`**: Prefix for Account-scoped keys
* **`AS`**: Prefix for Project-scoped keys
* **`secret_string`**: Cryptographically secure alphanumeric characters
## Making Authenticated Requests
Include your API key in the `Authorization` header of every request.
### Project API Key
```
Authorization: Bearer AS_your_project_api_key
```
```bash cURL expandable theme={null}
curl -X POST https://api.autosend.com/v1/mails/send \
-H "Authorization: Bearer AS_your_project_api_key" \
-H "Content-Type: application/json" \
-d '{
"to": {
"email": "customer@example.com"
},
"from": {
"email": "hello@mail.yourdomain.com"
},
"subject": "Test Email",
"html": "
1. Enter a descriptive name (e.g. `Production`, `Staging`, `Multi-tenant Service`)
2. Select the key type: **Account API Key** or **Project API Key**
3. If you selected **Project API Key**: choose which project this key belongs to
Click **"Generate"**.
After generation, your **API Key Secret** is shown once:
For security reasons, the API key secret is only shown once during creation. You will NOT be able to view it again.
* Copy the key immediately to your clipboard
* Store it securely in a password manager or secrets vault
* Download the .txt file as a backup
* Never commit API keys to version control
* Never share your API key publicly or in client-side code
## API Key Formats
AutoSend API keys follow these formats depending on the type:
```
ASA_[secret_string] ← Account API Key
AS_[secret_string] ← Project API Key
```
* **`ASA`**: Prefix for Account-scoped keys
* **`AS`**: Prefix for Project-scoped keys
* **`secret_string`**: Cryptographically secure alphanumeric characters
## Making Authenticated Requests
Include your API key in the `Authorization` header of every request.
### Project API Key
```
Authorization: Bearer AS_your_project_api_key
```
```bash cURL expandable theme={null}
curl -X POST https://api.autosend.com/v1/mails/send \
-H "Authorization: Bearer AS_your_project_api_key" \
-H "Content-Type: application/json" \
-d '{
"to": {
"email": "customer@example.com"
},
"from": {
"email": "hello@mail.yourdomain.com"
},
"subject": "Test Email",
"html": "Hello World!
"
}'
```
```javascript NodeJS expandable theme={null}
const fetch = require('node-fetch');
const API_KEY = process.env.AUTOSEND_API_KEY;
async function sendEmail() {
const response = await fetch('https://api.autosend.com/v1/mails/send', {
method: 'POST',
headers: {
Authorization: `Bearer ${API_KEY}`,
'Content-Type': 'application/json',
},
body: JSON.stringify({
to: {
email: 'customer@example.com',
},
from: {
email: 'hello@mail.yourdomain.com',
},
subject: 'Test Email',
html: 'Hello World!
',
}),
});
const data = await response.json();
console.log(data);
}
sendEmail();
```
```python Python expandable theme={null}
import requests
import os
API_KEY = os.environ.get('AUTOSEND_API_KEY')
def send_email():
url = 'https://api.autosend.com/v1/mails/send'
headers = {
'Authorization': f'Bearer {API_KEY}',
'Content-Type': 'application/json'
}
payload = {
'to': {
'email': 'customer@example.com'
},
'from': {
'email': 'hello@mail.yourdomain.com'
},
'subject': 'Test Email',
'html': 'Hello World!
'
}
response = requests.post(url, json=payload, headers=headers)
print(response.json())
send_email()
```
### Account API Key
Account API Keys require an additional `x-project-id` header on all requests, so AutoSend knows which project to operate on.
```
Authorization: Bearer ASA_your_account_api_key
x-project-id: your_project_id
```
The `x-project-id` header is **not required** when creating a new project, since no project exists
yet to target.
To find your Project ID, go to [Project Settings > General](https://autosend.com/settings/project) and copy it from the **Project Info** section.
```bash cURL expandable theme={null}
curl -X POST https://api.autosend.com/v1/mails/send \
-H "Authorization: Bearer ASA_your_account_api_key" \
-H "x-project-id: your_project_id" \
-H "Content-Type: application/json" \
-d '{
"to": {
"email": "customer@example.com"
},
"from": {
"email": "hello@mail.yourdomain.com"
},
"subject": "Test Email",
"html": "Hello World!
"
}'
```
```javascript NodeJS expandable theme={null}
const fetch = require('node-fetch');
const API_KEY = process.env.AUTOSEND_ACCOUNT_API_KEY;
const PROJECT_ID = process.env.AUTOSEND_PROJECT_ID;
async function sendEmail() {
const response = await fetch('https://api.autosend.com/v1/mails/send', {
method: 'POST',
headers: {
Authorization: `Bearer ${API_KEY}`,
'x-project-id': PROJECT_ID,
'Content-Type': 'application/json',
},
body: JSON.stringify({
to: {
email: 'customer@example.com',
},
from: {
email: 'hello@mail.yourdomain.com',
},
subject: 'Test Email',
html: 'Hello World!
',
}),
});
const data = await response.json();
console.log(data);
}
sendEmail();
```
```python Python expandable theme={null}
import requests
import os
API_KEY = os.environ.get('AUTOSEND_ACCOUNT_API_KEY')
PROJECT_ID = os.environ.get('AUTOSEND_PROJECT_ID')
def send_email():
url = 'https://api.autosend.com/v1/mails/send'
headers = {
'Authorization': f'Bearer {API_KEY}',
'x-project-id': PROJECT_ID,
'Content-Type': 'application/json'
}
payload = {
'to': {
'email': 'customer@example.com'
},
'from': {
'email': 'hello@mail.yourdomain.com'
},
'subject': 'Test Email',
'html': 'Hello World!
'
}
response = requests.post(url, json=payload, headers=headers)
print(response.json())
send_email()
```
## Choosing the Right API Key
* Use a **Project API Key** for everyday operations: sending emails, managing contacts, templates, campaigns, and webhooks within a specific project. This is the right key for most integrations.
* Use an **Account API Key** only when managing projects themselves - for example, when building a multi-tenant platform that automatically provisions new projects for each of your customers.
## Managing API Keys
### Viewing API Keys
In your dashboard under **Account > API Keys**, you can see:
* **API Key Name**: the label you assigned
* **Type**: Account or Project
* **Project**: the associated project (Project API Keys only)
* **Generated On**: creation date
Note: You cannot view the secret after creation. Only the key ID is visible.
### Deleting API Keys
To delete an API key:
1. Go to **Account > API Keys**
2. Find the key you want to delete
3. Click the trash icon
4. Confirm the deletion
When you delete an API key, it stops working immediately. Any applications or services using that
key will start receiving authentication errors. Make sure to update your applications before
deleting keys.
### Best Practices for API Key Management
1. **Use Environment Variables**
```bash theme={null}
# .env file
AUTOSEND_API_KEY=AS_your_project_api_key
AUTOSEND_ACCOUNT_API_KEY=ASA_your_account_api_key
AUTOSEND_PROJECT_ID=your_project_id
```
Never hardcode API keys in your source code.
2. **Separate Keys for Different Environments**
* Create separate Project API Keys for development, staging, and production
* Use descriptive names: `Production`, `Staging`, `Development`
* This allows you to rotate keys without affecting other environments
3. **Rotate Keys Regularly**
* Generate new keys periodically (every 90 days recommended)
* Update your applications with the new key
* Delete the old key after confirming the new one works
4. **Limit Key Exposure**
* Never commit keys to version control
* Don't include keys in client-side JavaScript
* Use secrets management services (AWS Secrets Manager, HashiCorp Vault, etc.)
* Add API keys to `.gitignore`:
```
.env
.env.local
config/secrets.json
```
## Authentication Errors
**Error Response:**
```json theme={null}
{
"success": false,
"message": "Unauthorized"
}
```
**Common Causes:**
* Missing `Authorization` header
* Invalid API key format
* Expired or deleted API key
* API key not properly prefixed with "Bearer "
**Solutions:**
* Verify the `Authorization` header is present
* Check that your API key is correct and hasn't been deleted
* Ensure the format is: `Authorization: Bearer YOUR_API_KEY`
* Confirm there's a space after "Bearer"
**Error Response:**
```json theme={null}
{
"success": false,
"message": "Forbidden"
}
```
**Common Causes:**
* API key doesn't have access to the requested resource
* Using a Project API Key to access a different project's resources
* Missing `x-project-id` header when using an Account API Key
**Solutions:**
* Verify you're using the correct API key for the project
* If using an Account API Key, ensure the `x-project-id` header is present and correct
* Check that the resource (domain, template, etc.) exists in the target project
### Keep Your API Keys Secret
API keys provide full access to your AutoSend account and should be treated like passwords:
* Never share API keys in public forums, support tickets, or chat
* Don't include keys in screenshots or screen recordings
* Revoke keys immediately if exposed
**HTTPS Only**
Always use HTTPS when making API requests. AutoSend APIs reject non-HTTPS requests to protect your API keys from interception.
### Rate Limiting
API keys are subject to rate limits:
* **2 requests per second** per API key
* **50 requests per minute** per API key
Exceeding these limits returns a `429 Too Many Requests` error. See the [API
Reference](/api-reference) for more details.