> ## Documentation Index
> Fetch the complete documentation index at: https://docs.autosend.com/llms.txt
> Use this file to discover all available pages before exploring further.
# How to Create an Email Automation
> Learn how to create a contact-triggered email automation in AutoSend, including setting up triggers, adding emails, configuring settings, and activating your automation.
export const AUTOSEND_PATHS = {
dashboard: 'https://autosend.com/dashboard',
apiKey: 'https://autosend.com/account/api-key',
faqs: 'https://autosend.com/faq',
marketingEmails: 'https://autosend.com/marketing-emails',
webhooks: 'https://autosend.com/webhooks',
composeByAutoSend: 'https://autosend.com/compose',
emailActivity: 'https://autosend.com/email-activities',
team: 'https://autosend.com/settings/team',
pricing: 'https://autosend.com/pricing',
verifyEmail: 'https://autosend.com/compose/email-builder?template=verify-email',
welcomeEmail: 'https://autosend.com/compose/email-builder?template=welcome-email',
productUpdate: 'https://autosend.com/compose/email-builder?template=product-update',
newsletter: 'https://autosend.com/compose/email-builder?template=newsletter',
automations: 'https://autosend.com/automations',
globalSuppressions: 'https://autosend.com/suppressions/global',
signup: 'https://autosend.com/signup',
domains: 'https://autosend.com/settings/domains',
smtpKey: 'https://autosend.com/settings/smtp',
logoKit: 'https://asend.email/logo',
contactsPage: 'https://autosend.com/contacts/list-and-segments',
accountBilling: 'https://autosend.com/account/billing',
accountUsage: 'https://autosend.com/account/usage',
terms: 'https://autosend.com/legal/terms',
inbound: 'https://autosend.com/email-activities/inbound'
};
export const APP_PATHS = {
home: '/',
quickstart: '/quickstart',
domainConfiguration: '/domain',
apiReference: '/api-reference',
sendEmail: '/api-reference/mails/send',
bulkSendEmail: '/api-reference/mails/bulk',
upsertContactApiRef: '/api-reference/contacts/upsert-contact',
transactional: '/transactional-emails',
emailActivity: '/transactional-emails/email-activity',
emailTemplates: '/transactional-emails/email-templates',
sendingEmail: '/quickstart/email-using-api',
transactionalTroubleshooting: '/transactional-emails/troubleshooting',
marketing: '/marketing-emails',
campaigns: '/marketing-emails/campaigns',
contacts: '/marketing-emails/contacts',
contactsIntroduction: '/marketing-emails/contacts/introduction',
contactsImportCsv: '/marketing-emails/contacts/import-csv',
contactsLists: '/marketing-emails/contacts/lists',
contactsSegments: '/marketing-emails/contacts/segments',
contactsCustomFields: '/marketing-emails/contacts/contact-properties',
contactsContactProperties: '/marketing-emails/contacts/contact-properties',
createContactPropertyApiRef: '/api-reference/contact-properties/create',
listContactPropertiesApiRef: '/api-reference/contact-properties/list',
getContactPropertyApiRef: '/api-reference/contact-properties/get-by-name',
deleteContactPropertyApiRef: '/api-reference/contact-properties/delete',
sender: '/marketing-emails/sender',
unsubscribeGroups: '/others/unsubscribe-groups',
webhookIntroduction: '/others/webhooks/introduction',
webhookEventType: '/others/webhooks/event-type',
webhookRetries: '/others/webhooks/retries',
webhookVerifyRequests: '/others/webhooks/verify-requests',
dynamicTemplates: '/dynamic-templates',
guides: '/guides',
sitemap: '/sitemap.xml',
team: '/others/team',
automations: '/automations',
events: '/automations/events',
sendEventApi: '/api-reference/events/send-event',
smtpIntroduction: '/quickstart/smtp',
betterAuth: '/guides/better-auth',
convexGuide: '/guides/convex',
templateVariables: '/transactional-emails/variables',
suppressions: '/others/suppressions',
rateLimit: '/api-reference/rate-limit',
nodejsSdk: '/sdk/nodejs',
smtpIntegrationGuides: '/guides/smtp',
apiKeys: '/api-keys',
encryptedPayloads: '/others/encrypted-payloads',
apiReferenceIntroduction: '/api-reference/introduction',
lovableGuide: '/ai/integrations/lovable',
aiIntroduction: '/ai/introduction',
aiSkills: '/ai/skills',
aiMcpServer: '/ai/mcp-server',
aiLovable: '/ai/integrations/lovable',
aiBolt: '/ai/integrations/bolt',
aiV0: '/ai/integrations/v0',
aiReplit: '/ai/integrations/replit',
mcpClaude: '/ai/mcp-clients/claude',
mcpCursor: '/ai/mcp-clients/cursor',
mcpCopilot: '/ai/mcp-clients/copilot',
mcpWindsurf: '/ai/mcp-clients/windsurf',
mcpCodex: '/ai/mcp-clients/codex',
mcpAntigravity: '/ai/mcp-clients/antigravity',
mcpChatgpt: '/ai/mcp-clients/chatgpt',
mcpRaycast: '/ai/mcp-clients/raycast',
domainWarmup: '/marketing-emails/domain-warmup',
projects: '/projects',
createAutomationApi: '/api-reference/automations/create-automation',
migrationSendgrid: '/migration/sendgrid',
migrationResend: '/migration/resend',
auth0CustomAction: '/guides/auth0-custom-action',
accountBilling: '/others/account/billing',
accountUsage: '/others/account/usage',
inboundIntroduction: '/inbound/introduction',
listInboundMessagesApi: '/api-reference/inbound-emails/list-messages',
getInboundMessageApi: '/api-reference/inbound-emails/get-message',
downloadInboundAttachmentApi: '/api-reference/inbound-emails/download-attachment',
replyToInboundMessageApi: '/api-reference/inbound-emails/reply-to-message',
wikiDailySendingLimit: '/wiki/daily-sending-limit'
};
## Prerequisites
Before creating an automation, make sure you have the following ready based on your trigger type:
* **For list/segment triggers:** Create a contact list or segment that represents your trigger condition.
* **For property-based triggers:** Ensure your contacts have the relevant custom fields set up. The automation will evaluate these properties to determine when to trigger.
## How to Create an Email Automation
Under **Marketing Emails** in the sidebar, select **Automations** and click **New Automation**.
An untitled automation will be created. Give it a descriptive name that clearly identifies its purpose, such as "Pro Plan Onboarding" or "Welcome Series."
Click on the **Trigger** card to configure what starts your automation. AutoSend offers four trigger types:
### New contact is added to
Select a contact list or segment. When a contact joins this list or segment, they automatically enter the automation.
**Example:** Create a segment called "Pro Plan Members" with the custom field `plan: pro`. When a user purchases a Pro plan and enters this segment, the automation triggers.
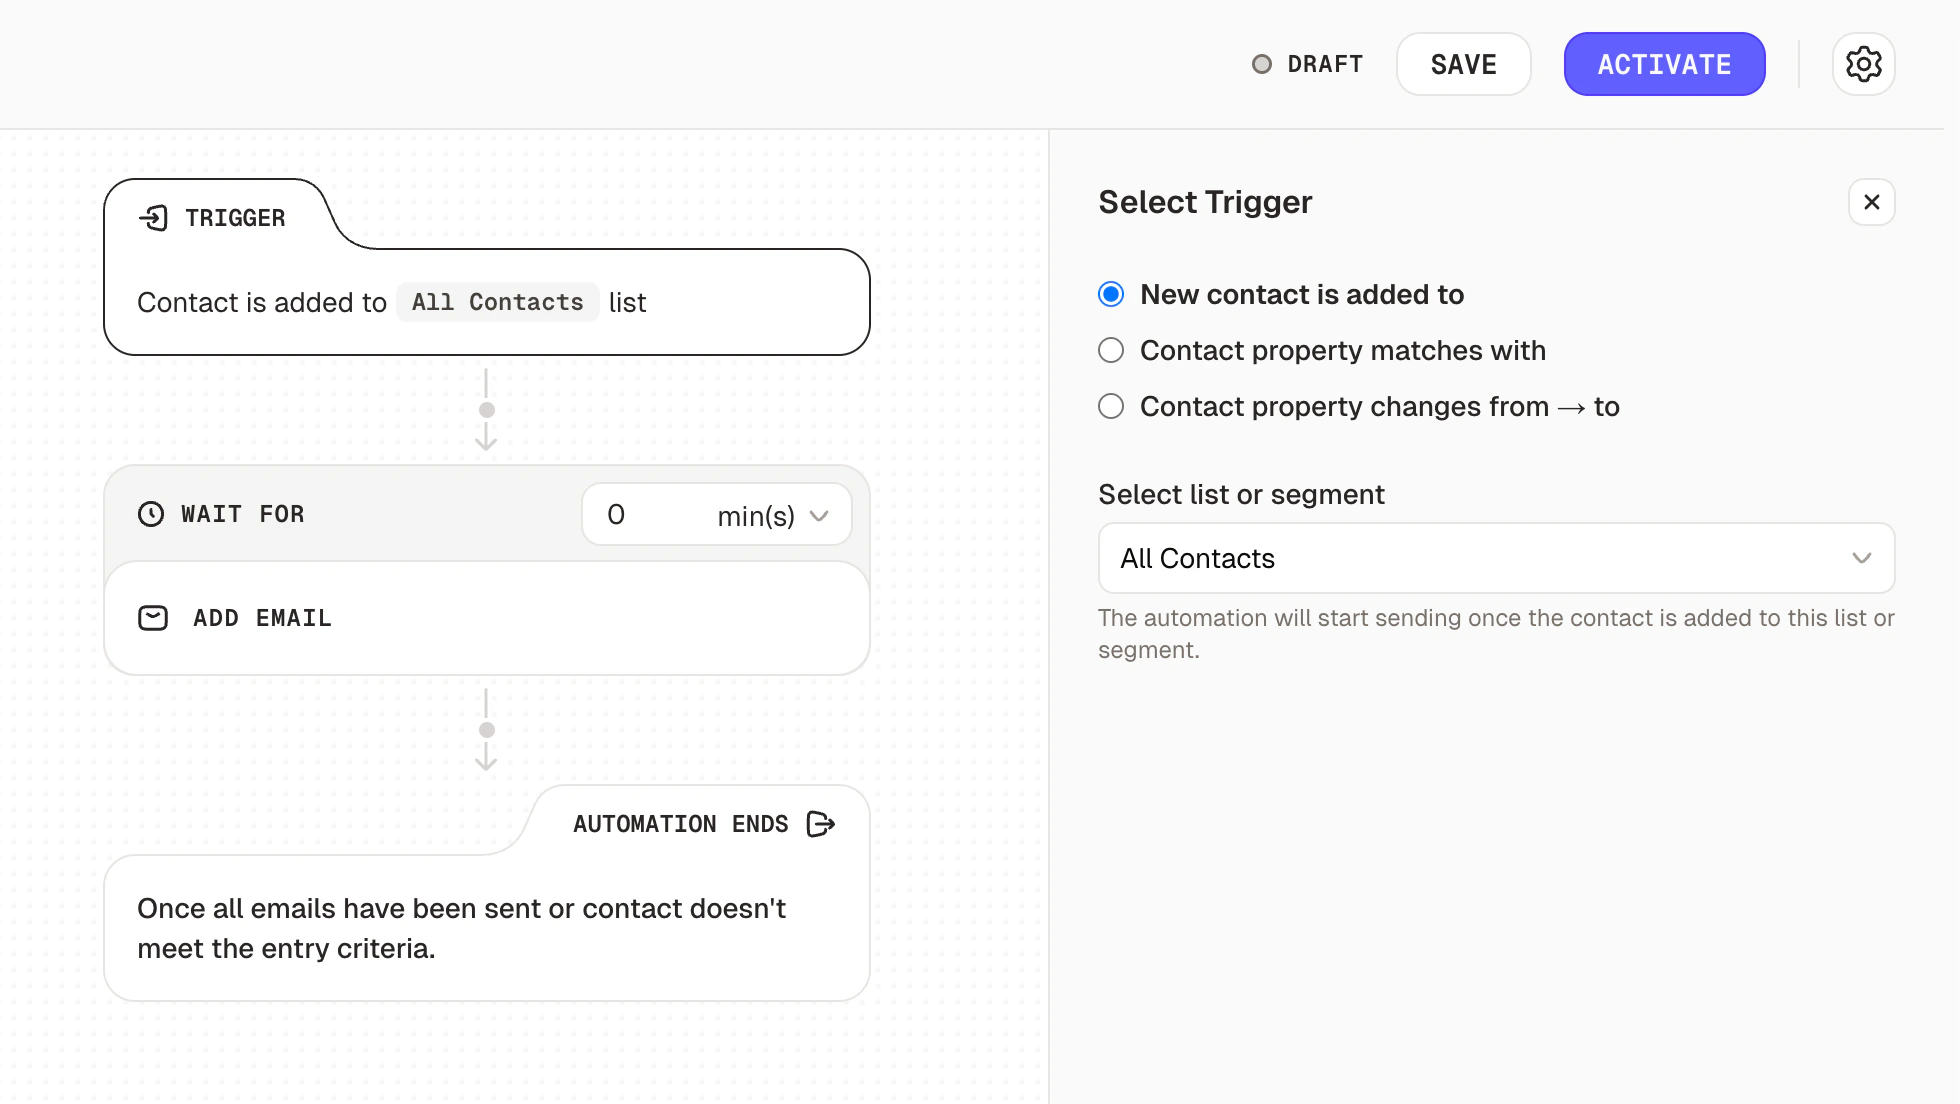 Only contacts added via API or manually after activation will enter this automation. Existing contacts and CSV imports are excluded.
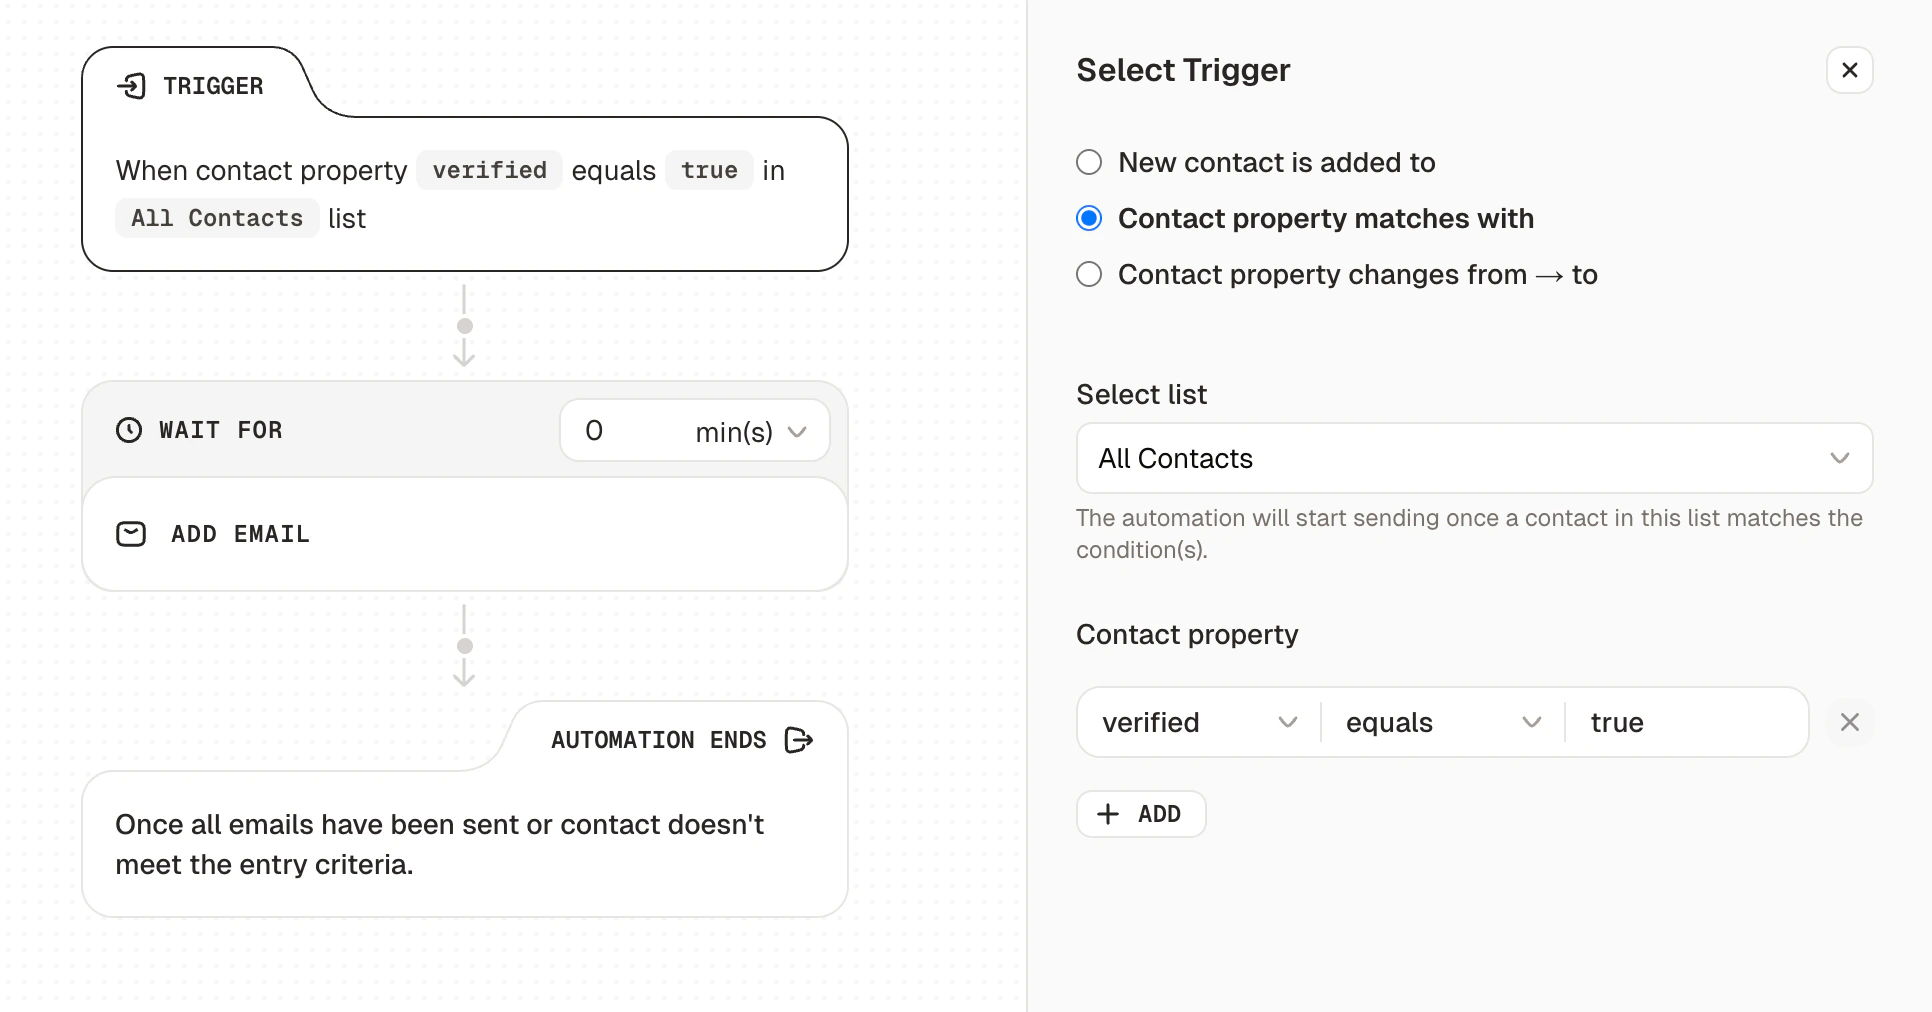
### Contact property matches with
Select a list to scope the contacts, then define a property condition. The automation triggers when a contact in that list matches your condition(s).
1. Choose a **contact property** from the dropdown (e.g., `verified`)
2. Select an **operator** (e.g., `equals`)
3. Enter the **value** to match (e.g., `true`)
4. Click **Add** to include additional conditions if needed
**Example:** Set `verified` equals `true` on the "All Contacts" list. Any contact whose `verified` property becomes `true` will enter the automation.
Only contacts added via API or manually after activation will enter this automation. Existing contacts and CSV imports are excluded.
### Contact property matches with
Select a list to scope the contacts, then define a property condition. The automation triggers when a contact in that list matches your condition(s).
1. Choose a **contact property** from the dropdown (e.g., `verified`)
2. Select an **operator** (e.g., `equals`)
3. Enter the **value** to match (e.g., `true`)
4. Click **Add** to include additional conditions if needed
**Example:** Set `verified` equals `true` on the "All Contacts" list. Any contact whose `verified` property becomes `true` will enter the automation.
 Only contacts added via API or manually after activation and matching the condition(s) will enter this automation. Existing contacts and CSV imports are excluded.
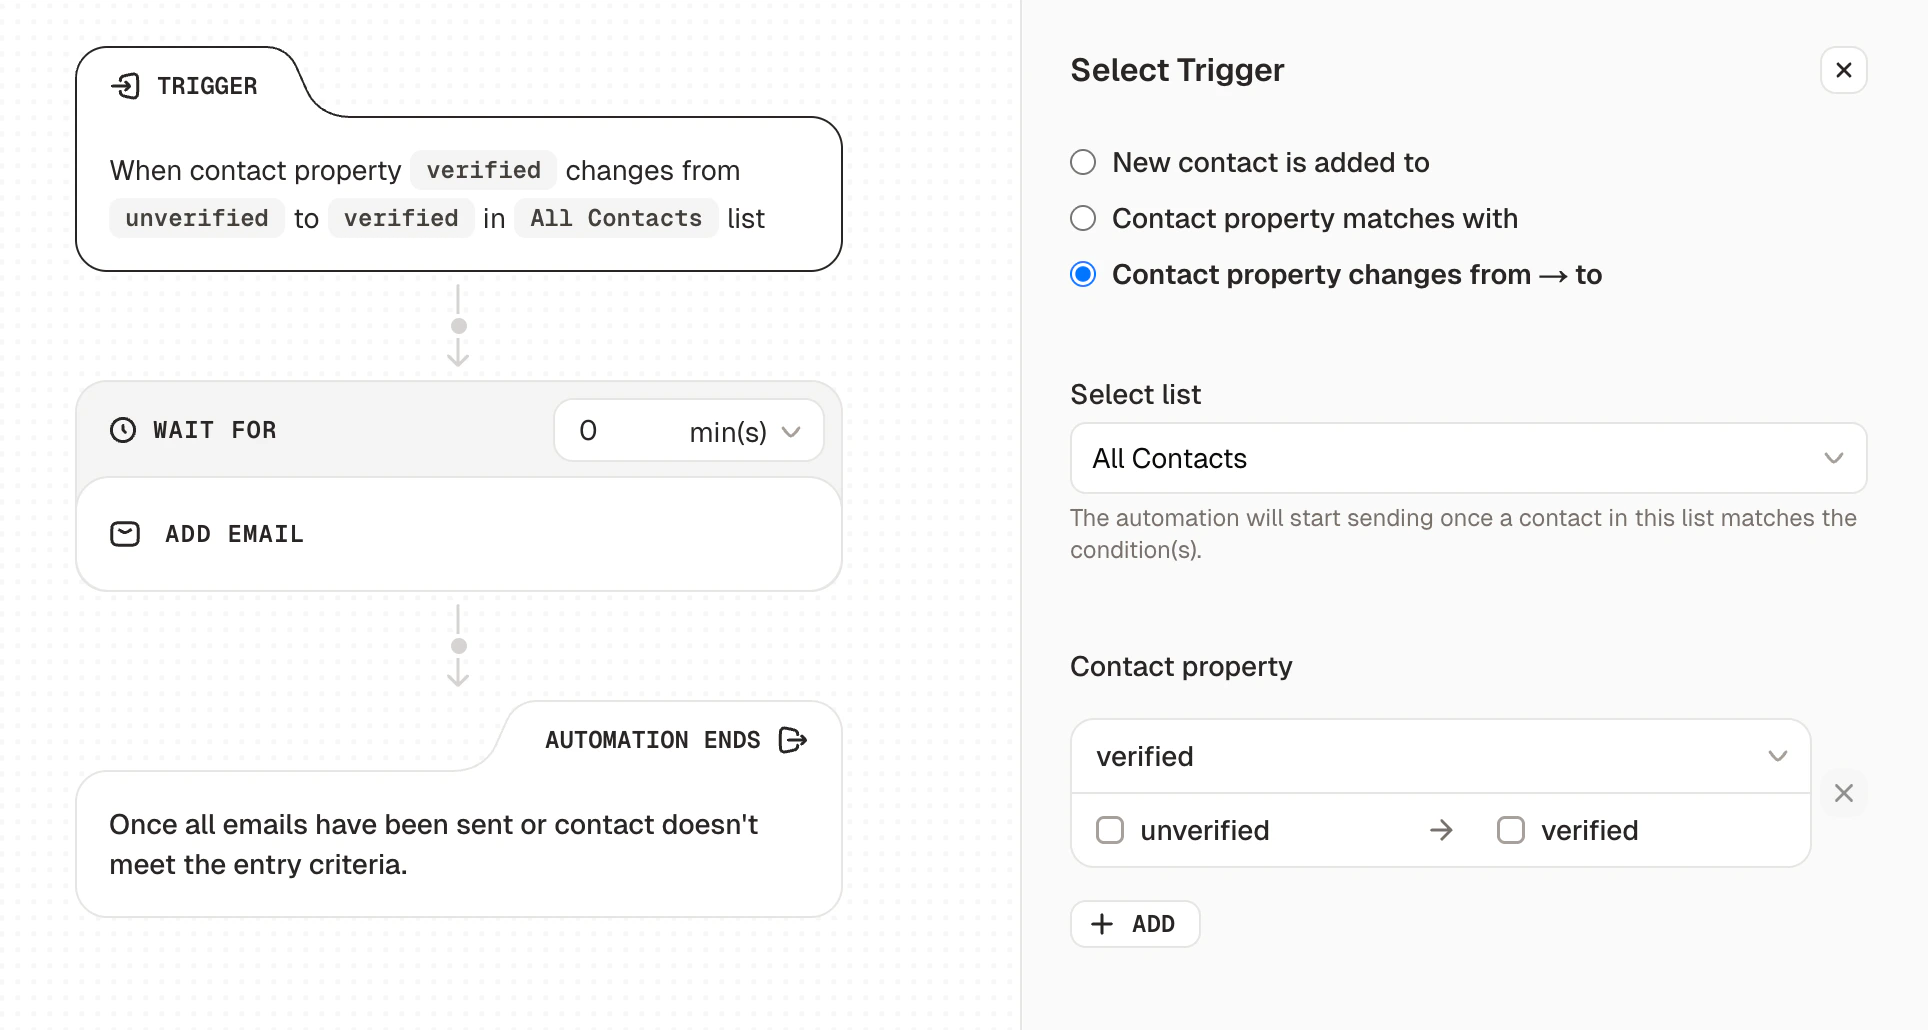
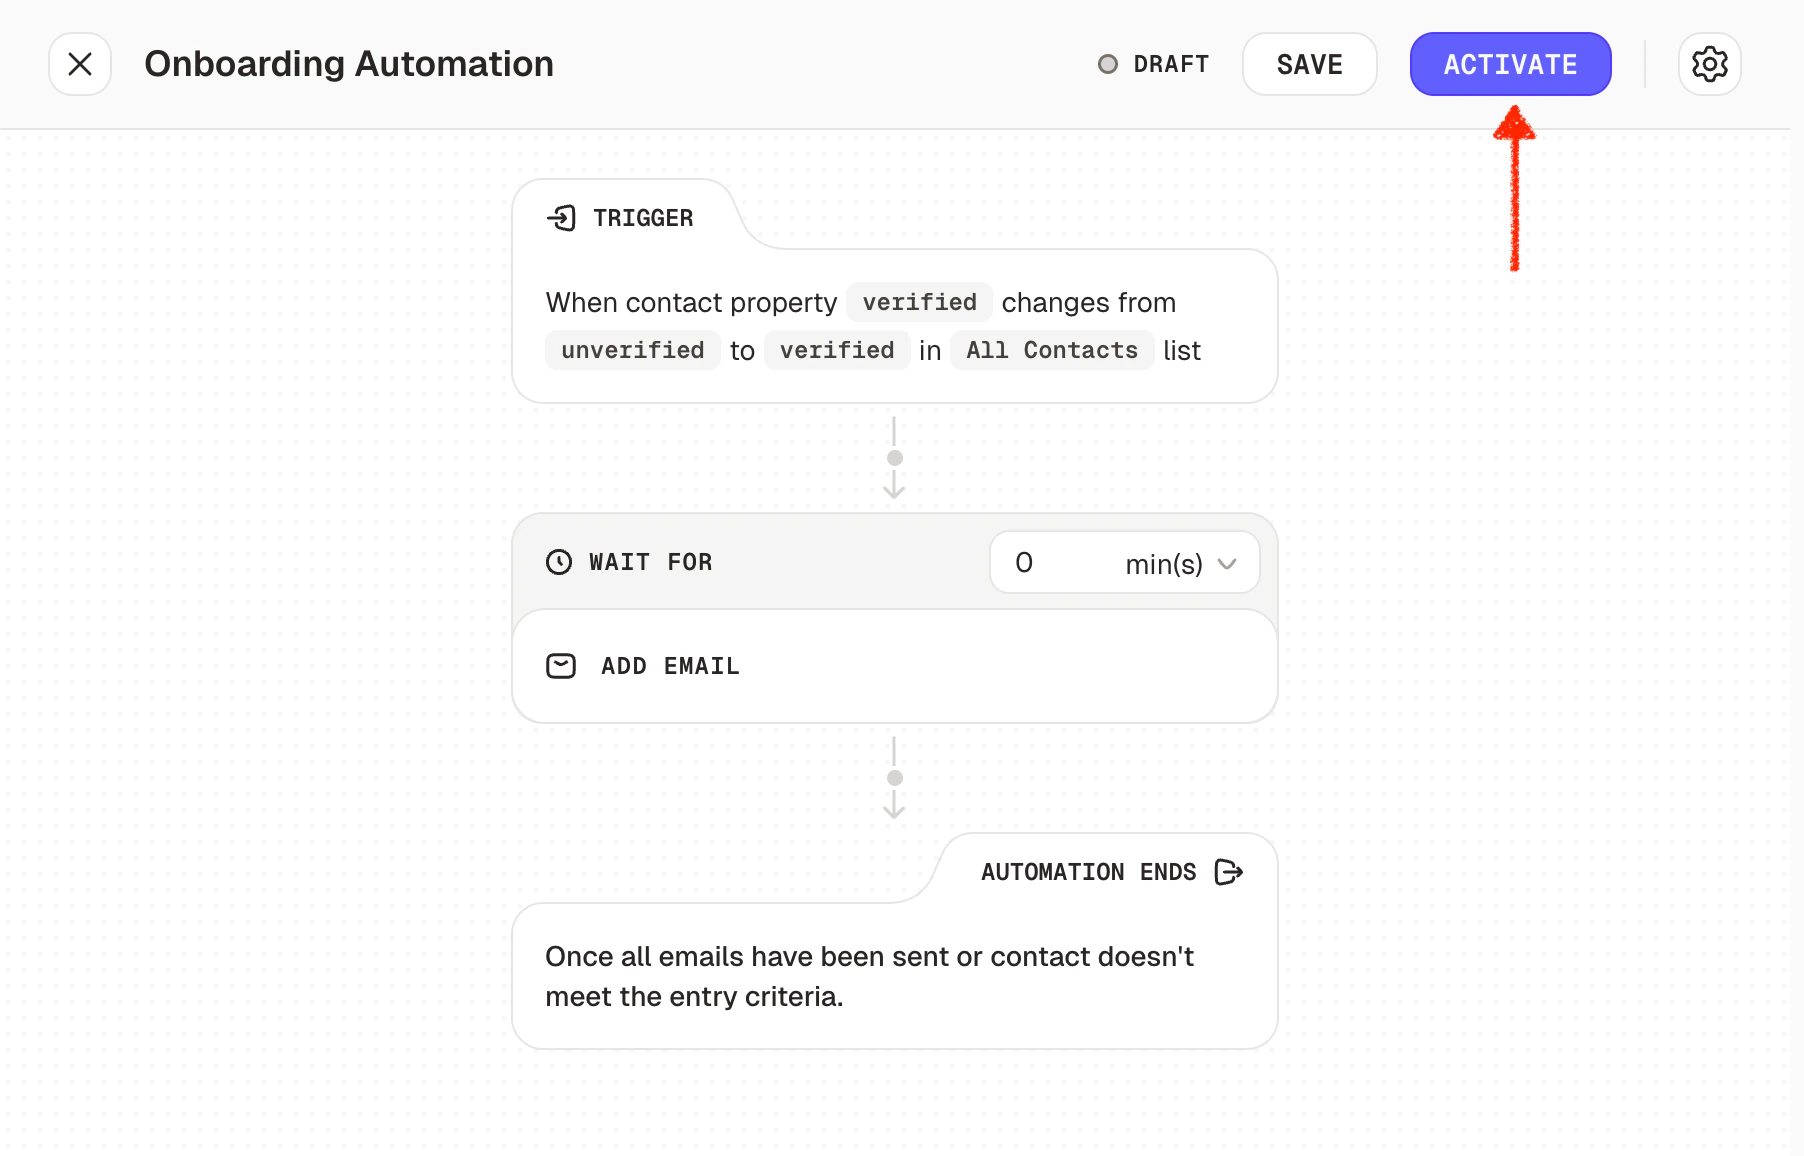
### Contact property changes from → to
Select a list to scope the contacts, then define one or more property transitions. The automation triggers when a contact's property changes from one specific value to another.
1. Choose a **contact property** from the dropdown (e.g., `published`)
2. Set the **from value** (e.g., `unpublished`) and **to value** (e.g., `published`)
3. Click **Add** to include additional property change conditions
4. Use **AND** / **OR** logic to combine multiple conditions
**Example:** Trigger when `published` changes from `unpublished` to `published` in the "All Contacts" list. Perfect for sending a congratulatory email when a user publishes their first project.
Only contacts added via API or manually after activation and matching the condition(s) will enter this automation. Existing contacts and CSV imports are excluded.
### Contact property changes from → to
Select a list to scope the contacts, then define one or more property transitions. The automation triggers when a contact's property changes from one specific value to another.
1. Choose a **contact property** from the dropdown (e.g., `published`)
2. Set the **from value** (e.g., `unpublished`) and **to value** (e.g., `published`)
3. Click **Add** to include additional property change conditions
4. Use **AND** / **OR** logic to combine multiple conditions
**Example:** Trigger when `published` changes from `unpublished` to `published` in the "All Contacts" list. Perfect for sending a congratulatory email when a user publishes their first project.
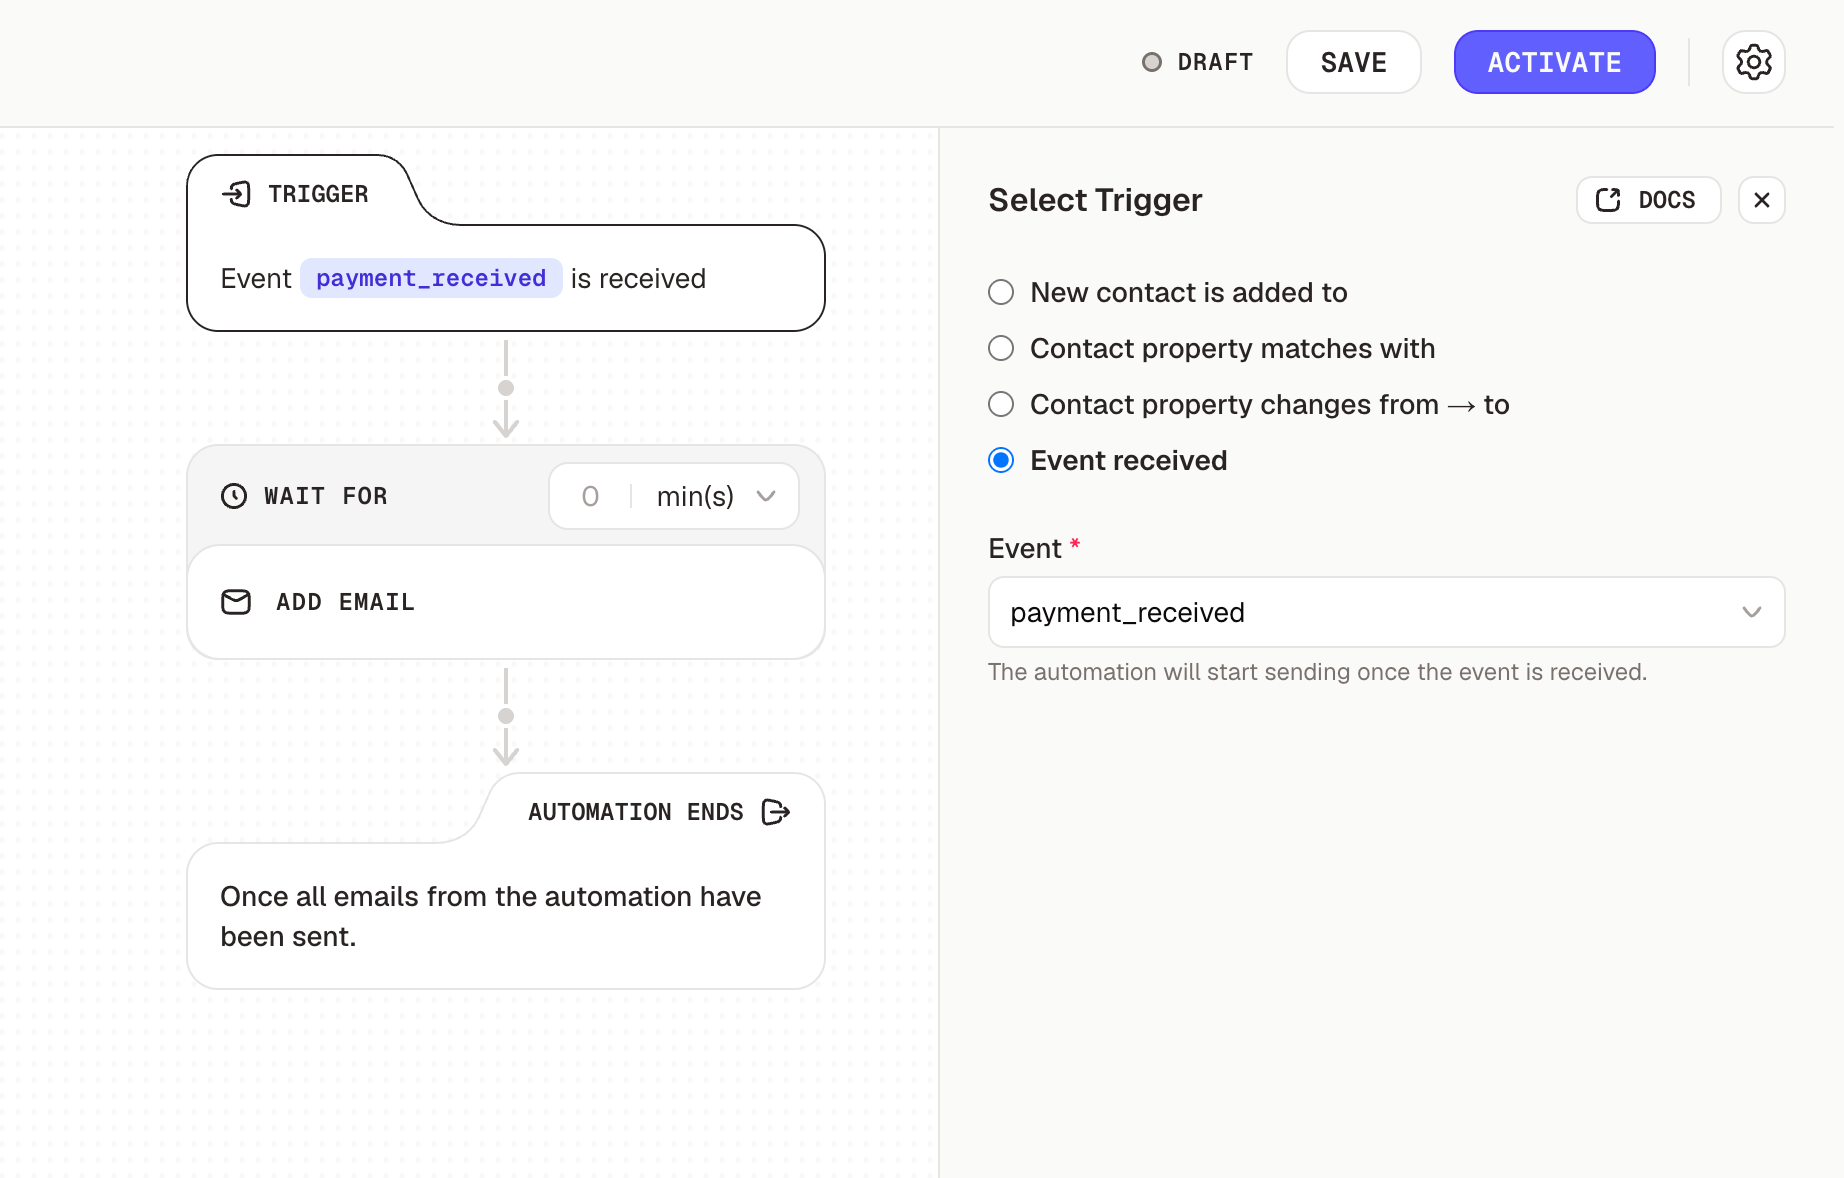
 ### Event Received
Pick a custom event from the **Event** dropdown. The automation triggers whenever that event is recorded for a contact, using the data carried in the event payload.
Unlike the other trigger types, **Event Received** is not scoped to a list or segment. Any contact for whom the event fires enters the automation.
1. Select **Event Received** as the trigger type
2. Choose an event from the **Event** dropdown (lists every event defined in this project)
3. Save the trigger
**Example:** Trigger when `order_completed` is received. Then use a [branch](/automations/branching) on the event's `order_total` property to send different post-purchase sequences for small vs. large orders.
### Event Received
Pick a custom event from the **Event** dropdown. The automation triggers whenever that event is recorded for a contact, using the data carried in the event payload.
Unlike the other trigger types, **Event Received** is not scoped to a list or segment. Any contact for whom the event fires enters the automation.
1. Select **Event Received** as the trigger type
2. Choose an event from the **Event** dropdown (lists every event defined in this project)
3. Save the trigger
**Example:** Trigger when `order_completed` is received. Then use a [branch](/automations/branching) on the event's `order_total` property to send different post-purchase sequences for small vs. large orders.
 Only events received after the automation is activated will trigger it. Historical events are not replayed. Don't have an event yet? See Events to define one.
1. Click **Add Email** to create your first email in the sequence
2. Set the **Wait For** timing to determine when this email should be sent:
* By default, the timing is set to 0 seconds (immediately)
* Adjust the timing based on your email strategy (e.g., 30 mins, 6 hours, 3 days)
3. Design your email content, subject line, and preview text and select the sender
4. Repeat to add more emails to your sequence
Only events received after the automation is activated will trigger it. Historical events are not replayed. Don't have an event yet? See Events to define one.
1. Click **Add Email** to create your first email in the sequence
2. Set the **Wait For** timing to determine when this email should be sent:
* By default, the timing is set to 0 seconds (immediately)
* Adjust the timing based on your email strategy (e.g., 30 mins, 6 hours, 3 days)
3. Design your email content, subject line, and preview text and select the sender
4. Repeat to add more emails to your sequence
 You can add up to 10 emails in a single automation. Plan your sequence thoughtfully to deliver value without overwhelming your contacts.
Configure the following settings for your automation:
* **Automation name**: Give your automation a descriptive name (e.g., "Onboarding Automation").
* **Unsubscribe group**: Select an appropriate unsubscribe group. Automations are treated as marketing emails and are required to include an unsubscribe link for compliance with email regulations.
* **Tracking**: Toggle tracking for:
* **Open rate**: An invisible image is appended to HTML emails to track if they have been opened.
* **Clicks**: AutoSend tracks clicks by rewriting links in your email. When clicked, they pass through an AutoSend server before redirecting to the original URL.
You can add up to 10 emails in a single automation. Plan your sequence thoughtfully to deliver value without overwhelming your contacts.
Configure the following settings for your automation:
* **Automation name**: Give your automation a descriptive name (e.g., "Onboarding Automation").
* **Unsubscribe group**: Select an appropriate unsubscribe group. Automations are treated as marketing emails and are required to include an unsubscribe link for compliance with email regulations.
* **Tracking**: Toggle tracking for:
* **Open rate**: An invisible image is appended to HTML emails to track if they have been opened.
* **Clicks**: AutoSend tracks clicks by rewriting links in your email. When clicked, they pass through an AutoSend server before redirecting to the original URL.
 Once you've configured all settings and added your emails:
1. Review your automation flow to ensure everything is correct
2. Send test emails to verify content and personalization
3. Click **Activate** to make your automation live
Once you've configured all settings and added your emails:
1. Review your automation flow to ensure everything is correct
2. Send test emails to verify content and personalization
3. Click **Activate** to make your automation live
 Your automation is now active and will begin triggering for contacts who meet the trigger conditions.
The automation ends automatically once all emails have been sent or the contact no longer meets
the entry criteria. There's nothing to configure here. This is handled by default.
## Troubleshooting
Your automation is now active and will begin triggering for contacts who meet the trigger conditions.
The automation ends automatically once all emails have been sent or the contact no longer meets
the entry criteria. There's nothing to configure here. This is handled by default.
## Troubleshooting
- Verify the automation is in **Active** state, not Draft or Paused.
- Check that contacts are actually joining your trigger list or segment.
- Ensure your list or segment criteria are correctly configured.
- For property-based triggers, confirm the contact property exists and has the expected values.
- Contacts uploaded via CSV won't trigger automations. Only contacts updated/added via API or from the dashboard will be enrolled in automations.
- Verify the contact property name matches exactly (property names are case-sensitive).
-
For "matches with" triggers, check that the property value matches the condition you set.
-
For "changes from → to" triggers, ensure the contact's property actually transitions between
the specified values. Setting a value for the first time does not count as a change.
- Check that the contact belongs to the list you selected for the trigger.
-
Confirm the automation was in **Active** state before the event was sent. Events received
while the automation is in Draft or Paused are not replayed when you activate it later.
-
Check that the `eventName` in your API call matches the event definition exactly (names are
case-sensitive).
-
Verify the event identifies a contact that exists in your project. Events sent with an `email`
or `contactId` that doesn't resolve to a contact are rejected.
-
Make sure the event still exists. If it was deleted, the automation's trigger no longer
resolves and won't fire.
- Review your **Wait For** settings between each email.
-
Remember that timing starts from when the contact enters the automation, not from a specific
time of day.
- Check if they were removed from the trigger list/segment, or if their contact property no longer matches the trigger condition, or if the property changed away from the expected value.
- Verify the automation hasn't been paused.
- Confirm they haven't unsubscribed from these emails.