> ## Documentation Index
> Fetch the complete documentation index at: https://docs.autosend.com/llms.txt
> Use this file to discover all available pages before exploring further.
# How to Add Sending Domain in AutoSend?
> Here's a step-by-step guide on how to verify and authenticate domain on AutoSend for sending emails.
export function urlFormatter(url, options = {}) {
if (!url || typeof url !== "string") return "";
const opts = {
...options
};
let hyperlink = url;
if (!(/^(http|https):\/\//i).test(hyperlink.toLowerCase())) {
hyperlink = `https://${hyperlink}`;
}
try {
const urlObj = new URL(hyperlink);
const queryParams = {
...Object.fromEntries(urlObj.searchParams)
};
if (opts.addRef) {
queryParams.ref = REF_NAME;
}
if (opts.ref) {
queryParams.ref = opts.ref;
}
if (opts.additionalQueryParams) {
Object.entries(opts.additionalQueryParams).forEach(([key, value]) => {
queryParams[key] = value;
});
}
urlObj.search = new URLSearchParams(queryParams);
return urlObj.toString();
} catch (e) {
return hyperlink;
}
}
export const AUTOSEND_DOCS_DOMAIN = "https://docs.autosend.com";
export const WHATS_MY_DNS_LINK = "https://whatsmydns.net";
export const DNS_CHECKER_LINK = "https://dnschecker.org";
export const SUPPORT_EMAIL = "support@autosend.com";
export const APP_PATHS = {
home: '/',
quickstart: '/quickstart',
domainConfiguration: '/domain',
apiReference: '/api-reference',
sendEmail: '/api-reference/mails/send',
bulkSendEmail: '/api-reference/mails/bulk',
upsertContactApiRef: '/api-reference/contacts/upsert-contact',
transactional: '/transactional-emails',
emailActivity: '/transactional-emails/email-activity',
emailTemplates: '/transactional-emails/email-templates',
sendingEmail: '/quickstart/email-using-api',
transactionalTroubleshooting: '/transactional-emails/troubleshooting',
marketing: '/marketing-emails',
campaigns: '/marketing-emails/campaigns',
contacts: '/marketing-emails/contacts',
contactsIntroduction: '/marketing-emails/contacts/introduction',
contactsImportCsv: '/marketing-emails/contacts/import-csv',
contactsLists: '/marketing-emails/contacts/lists',
contactsSegments: '/marketing-emails/contacts/segments',
contactsCustomFields: '/marketing-emails/contacts/contact-properties',
contactsContactProperties: '/marketing-emails/contacts/contact-properties',
createContactPropertyApiRef: '/api-reference/contact-properties/create',
listContactPropertiesApiRef: '/api-reference/contact-properties/list',
getContactPropertyApiRef: '/api-reference/contact-properties/get-by-name',
deleteContactPropertyApiRef: '/api-reference/contact-properties/delete',
sender: '/marketing-emails/sender',
unsubscribeGroups: '/others/unsubscribe-groups',
webhookIntroduction: '/others/webhooks/introduction',
webhookEventType: '/others/webhooks/event-type',
webhookRetries: '/others/webhooks/retries',
webhookVerifyRequests: '/others/webhooks/verify-requests',
dynamicTemplates: '/dynamic-templates',
guides: '/guides',
sitemap: '/sitemap.xml',
team: '/others/team',
automations: '/automations',
events: '/automations/events',
sendEventApi: '/api-reference/events/send-event',
smtpIntroduction: '/quickstart/smtp',
betterAuth: '/guides/better-auth',
convexGuide: '/guides/convex',
templateVariables: '/transactional-emails/variables',
suppressions: '/others/suppressions',
rateLimit: '/api-reference/rate-limit',
nodejsSdk: '/sdk/nodejs',
smtpIntegrationGuides: '/guides/smtp',
apiKeys: '/api-keys',
encryptedPayloads: '/others/encrypted-payloads',
apiReferenceIntroduction: '/api-reference/introduction',
lovableGuide: '/ai/integrations/lovable',
aiIntroduction: '/ai/introduction',
aiSkills: '/ai/skills',
aiMcpServer: '/ai/mcp-server',
aiLovable: '/ai/integrations/lovable',
aiBolt: '/ai/integrations/bolt',
aiV0: '/ai/integrations/v0',
aiReplit: '/ai/integrations/replit',
mcpClaude: '/ai/mcp-clients/claude',
mcpCursor: '/ai/mcp-clients/cursor',
mcpCopilot: '/ai/mcp-clients/copilot',
mcpWindsurf: '/ai/mcp-clients/windsurf',
mcpCodex: '/ai/mcp-clients/codex',
mcpAntigravity: '/ai/mcp-clients/antigravity',
mcpChatgpt: '/ai/mcp-clients/chatgpt',
mcpRaycast: '/ai/mcp-clients/raycast',
domainWarmup: '/marketing-emails/domain-warmup',
projects: '/projects',
createAutomationApi: '/api-reference/automations/create-automation',
migrationSendgrid: '/migration/sendgrid',
migrationResend: '/migration/resend',
auth0CustomAction: '/guides/auth0-custom-action',
accountBilling: '/others/account/billing',
accountUsage: '/others/account/usage',
inboundIntroduction: '/inbound/introduction',
listInboundMessagesApi: '/api-reference/inbound-emails/list-messages',
getInboundMessageApi: '/api-reference/inbound-emails/get-message',
downloadInboundAttachmentApi: '/api-reference/inbound-emails/download-attachment',
replyToInboundMessageApi: '/api-reference/inbound-emails/reply-to-message',
wikiDailySendingLimit: '/wiki/daily-sending-limit'
};
Before you can send emails through AutoSend, you need to verify ownership of your sending domain. This ensures:
* **Email deliverability**: Verified domains have better inbox placement rates
* **Authentication**: Proves you own the domain you’re sending from
* **Security**: Prevents unauthorized use of your domain for sending emails
* **Compliance**: Meets industry standards for email authentication (SPF, DKIM, DMARC)
**Pro Tip: Use a Subdomain**
We recommend using a subdomain (like `mail.yourdomain.com` or `emails.yourdomain.com`) instead of your root domain. This provides better email deliverability and keeps your transactional emails separate from your main domain’s reputation.
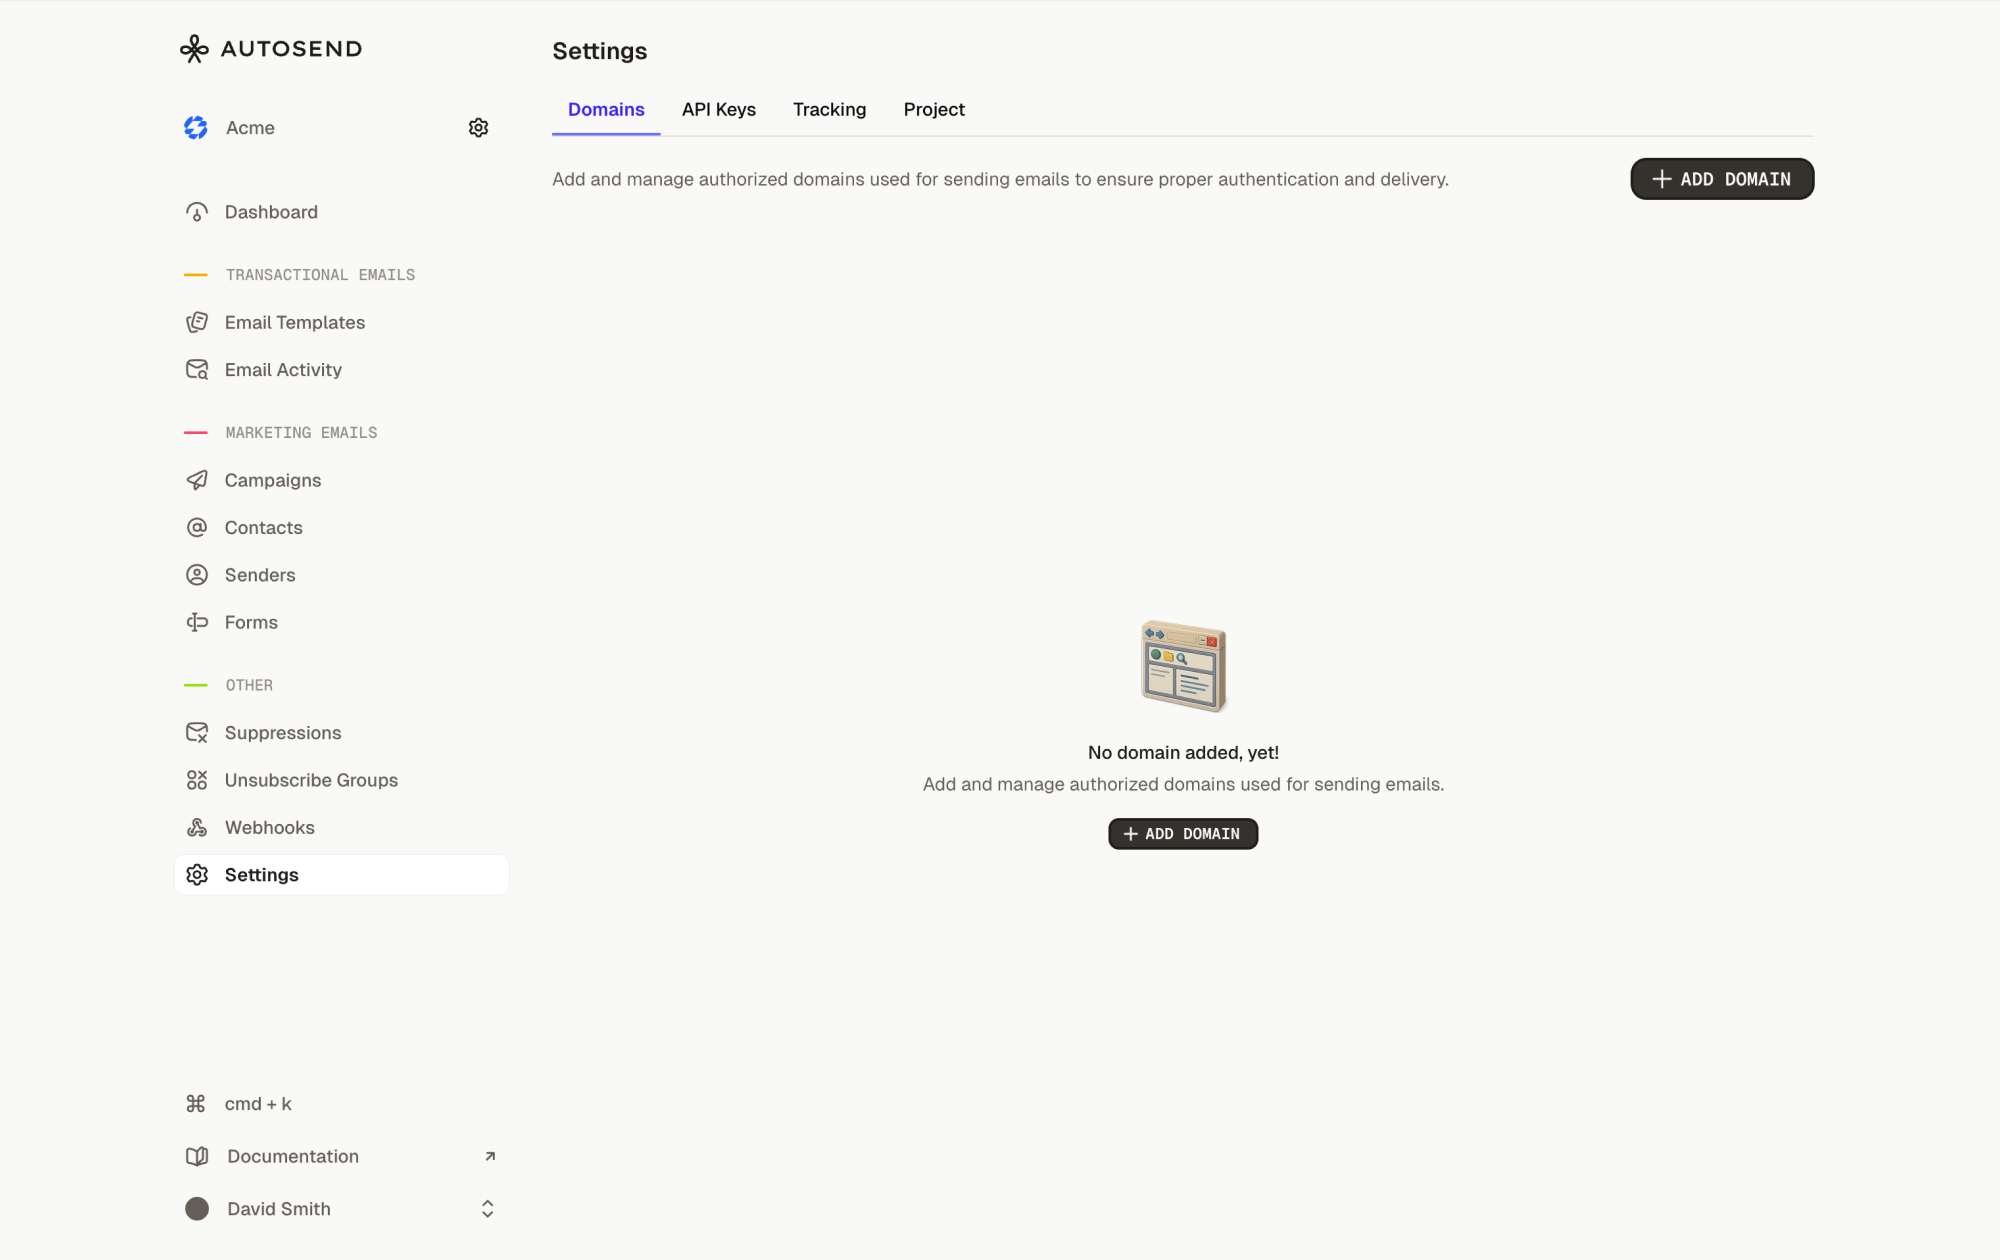
1. Navigate to **Settings > Domains** in your AutoSend dashboard and click the **Add Domain** button.
 2. Enter your sending domain **without** `http://` or `https://`
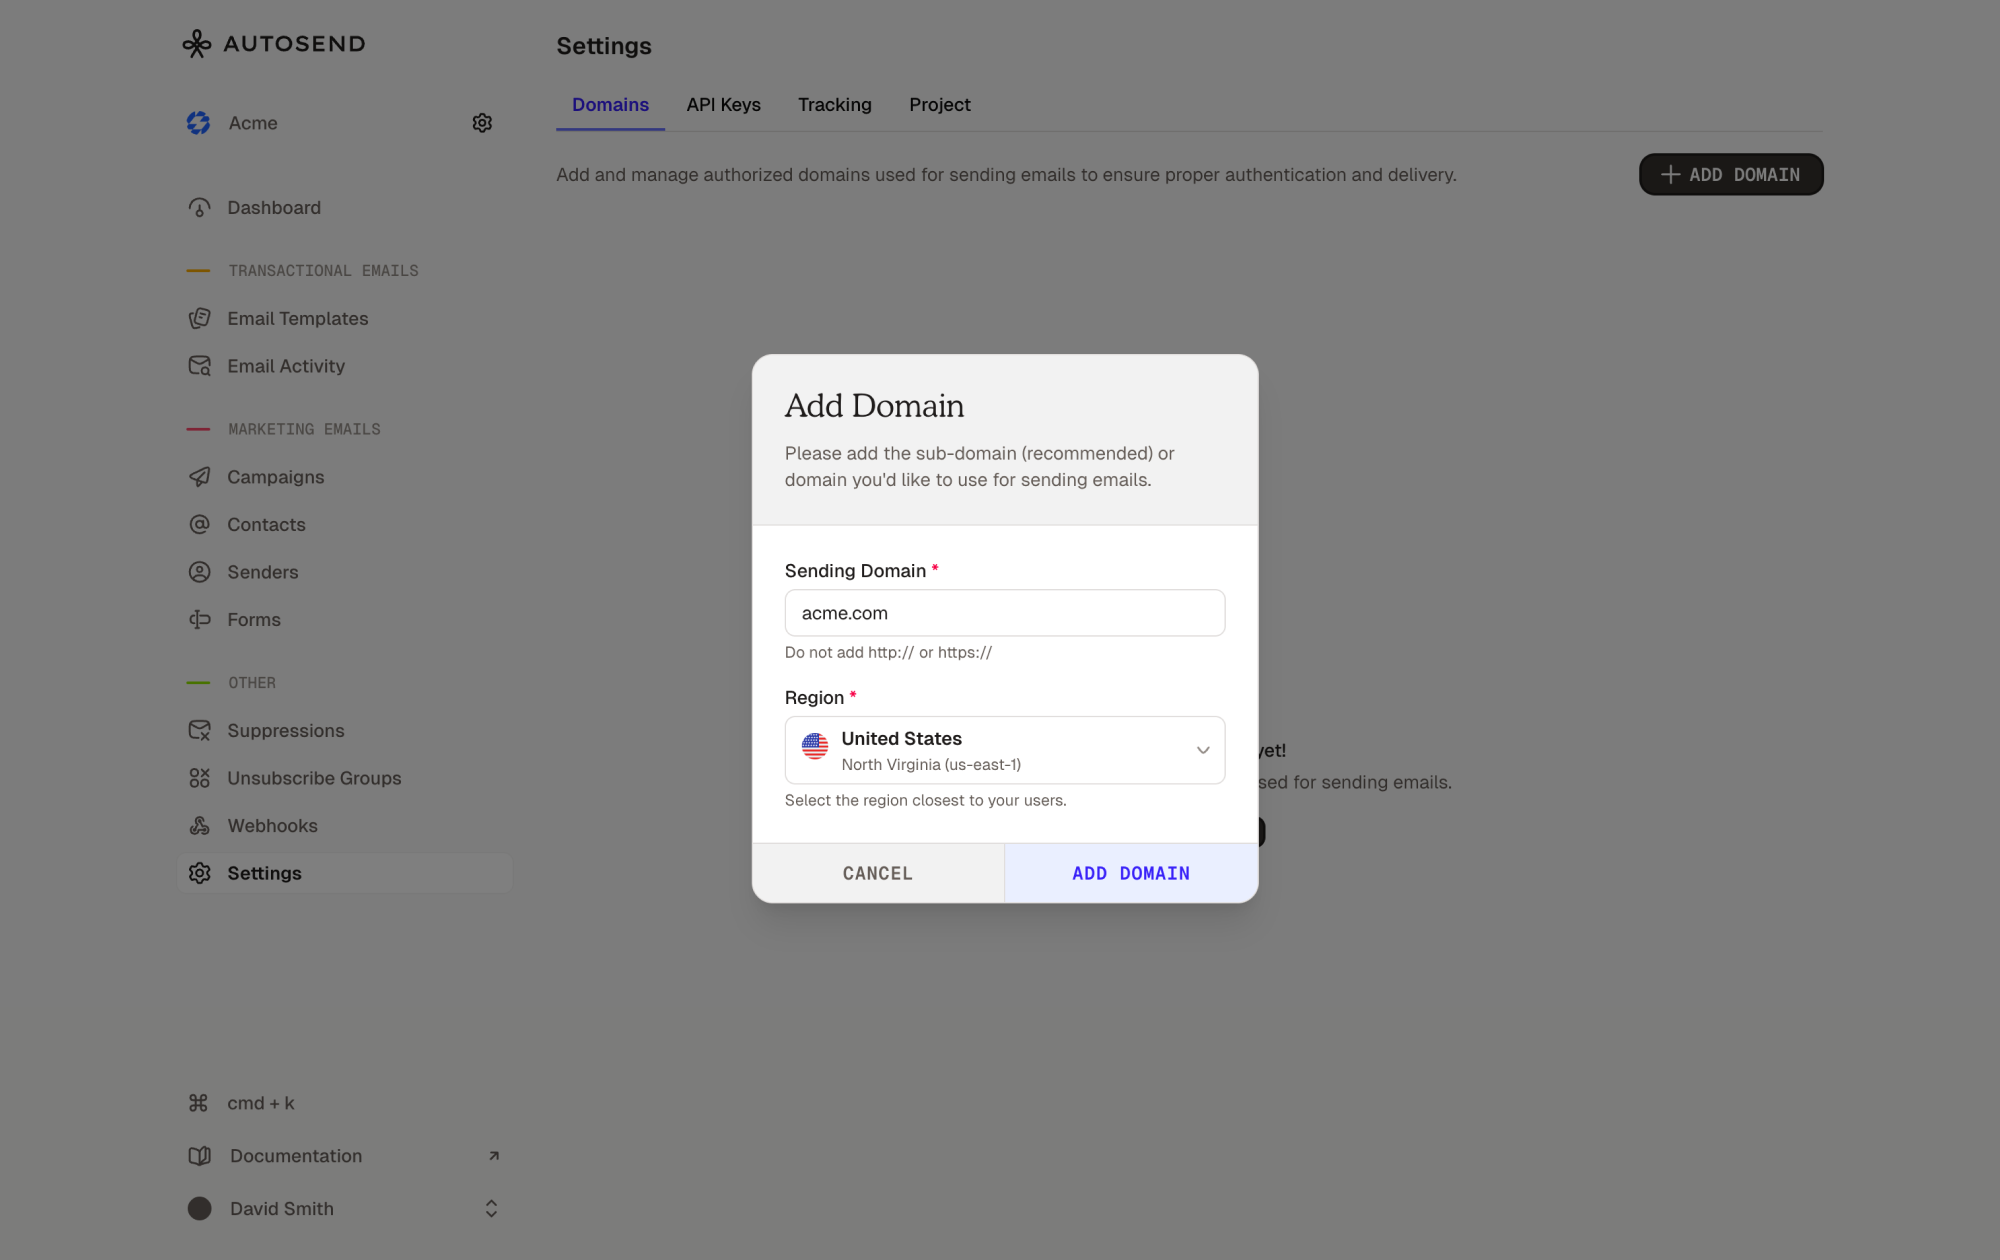 3. Choose the AutoSend region closest to your users for optimal email delivery performance. Available regions include:
* **US East (N. Virginia)** - `us-east-1`
* **US East (Ohio)** - `us-east-2`
* **Asia Pacific (Mumbai)** - `ap-south-1`
* **Europe (Frankfurt)** - `eu-central-1`
The region you select will be used to send your emails and should be chosen based on where most of your recipients are located.
If you want support for other regions, please contact us at {SUPPORT_EMAIL}
Once your domain is added, AutoSend will generate the required DNS records. You’ll need to add these records to your domain’s DNS settings. AutoSend requires two types of DNS records:
### DKIM and SPF Records
These records enable email authentication and prevent email spoofing.
* **Ownership Verification Record**: Verifies you own the domain
* **DKIM Record(s)**: Cryptographic signatures that prove email authenticity
* **Mail-From Record**: Specifies authorized email sending servers (SPF)
### DMARC Record
DMARC (Domain-based Message Authentication, Reporting & Conformance) adds an extra layer of email authentication and provides reporting on email authentication status.
3. Choose the AutoSend region closest to your users for optimal email delivery performance. Available regions include:
* **US East (N. Virginia)** - `us-east-1`
* **US East (Ohio)** - `us-east-2`
* **Asia Pacific (Mumbai)** - `ap-south-1`
* **Europe (Frankfurt)** - `eu-central-1`
The region you select will be used to send your emails and should be chosen based on where most of your recipients are located.
If you want support for other regions, please contact us at {SUPPORT_EMAIL}
Once your domain is added, AutoSend will generate the required DNS records. You’ll need to add these records to your domain’s DNS settings. AutoSend requires two types of DNS records:
### DKIM and SPF Records
These records enable email authentication and prevent email spoofing.
* **Ownership Verification Record**: Verifies you own the domain
* **DKIM Record(s)**: Cryptographic signatures that prove email authenticity
* **Mail-From Record**: Specifies authorized email sending servers (SPF)
### DMARC Record
DMARC (Domain-based Message Authentication, Reporting & Conformance) adds an extra layer of email authentication and provides reporting on email authentication status.
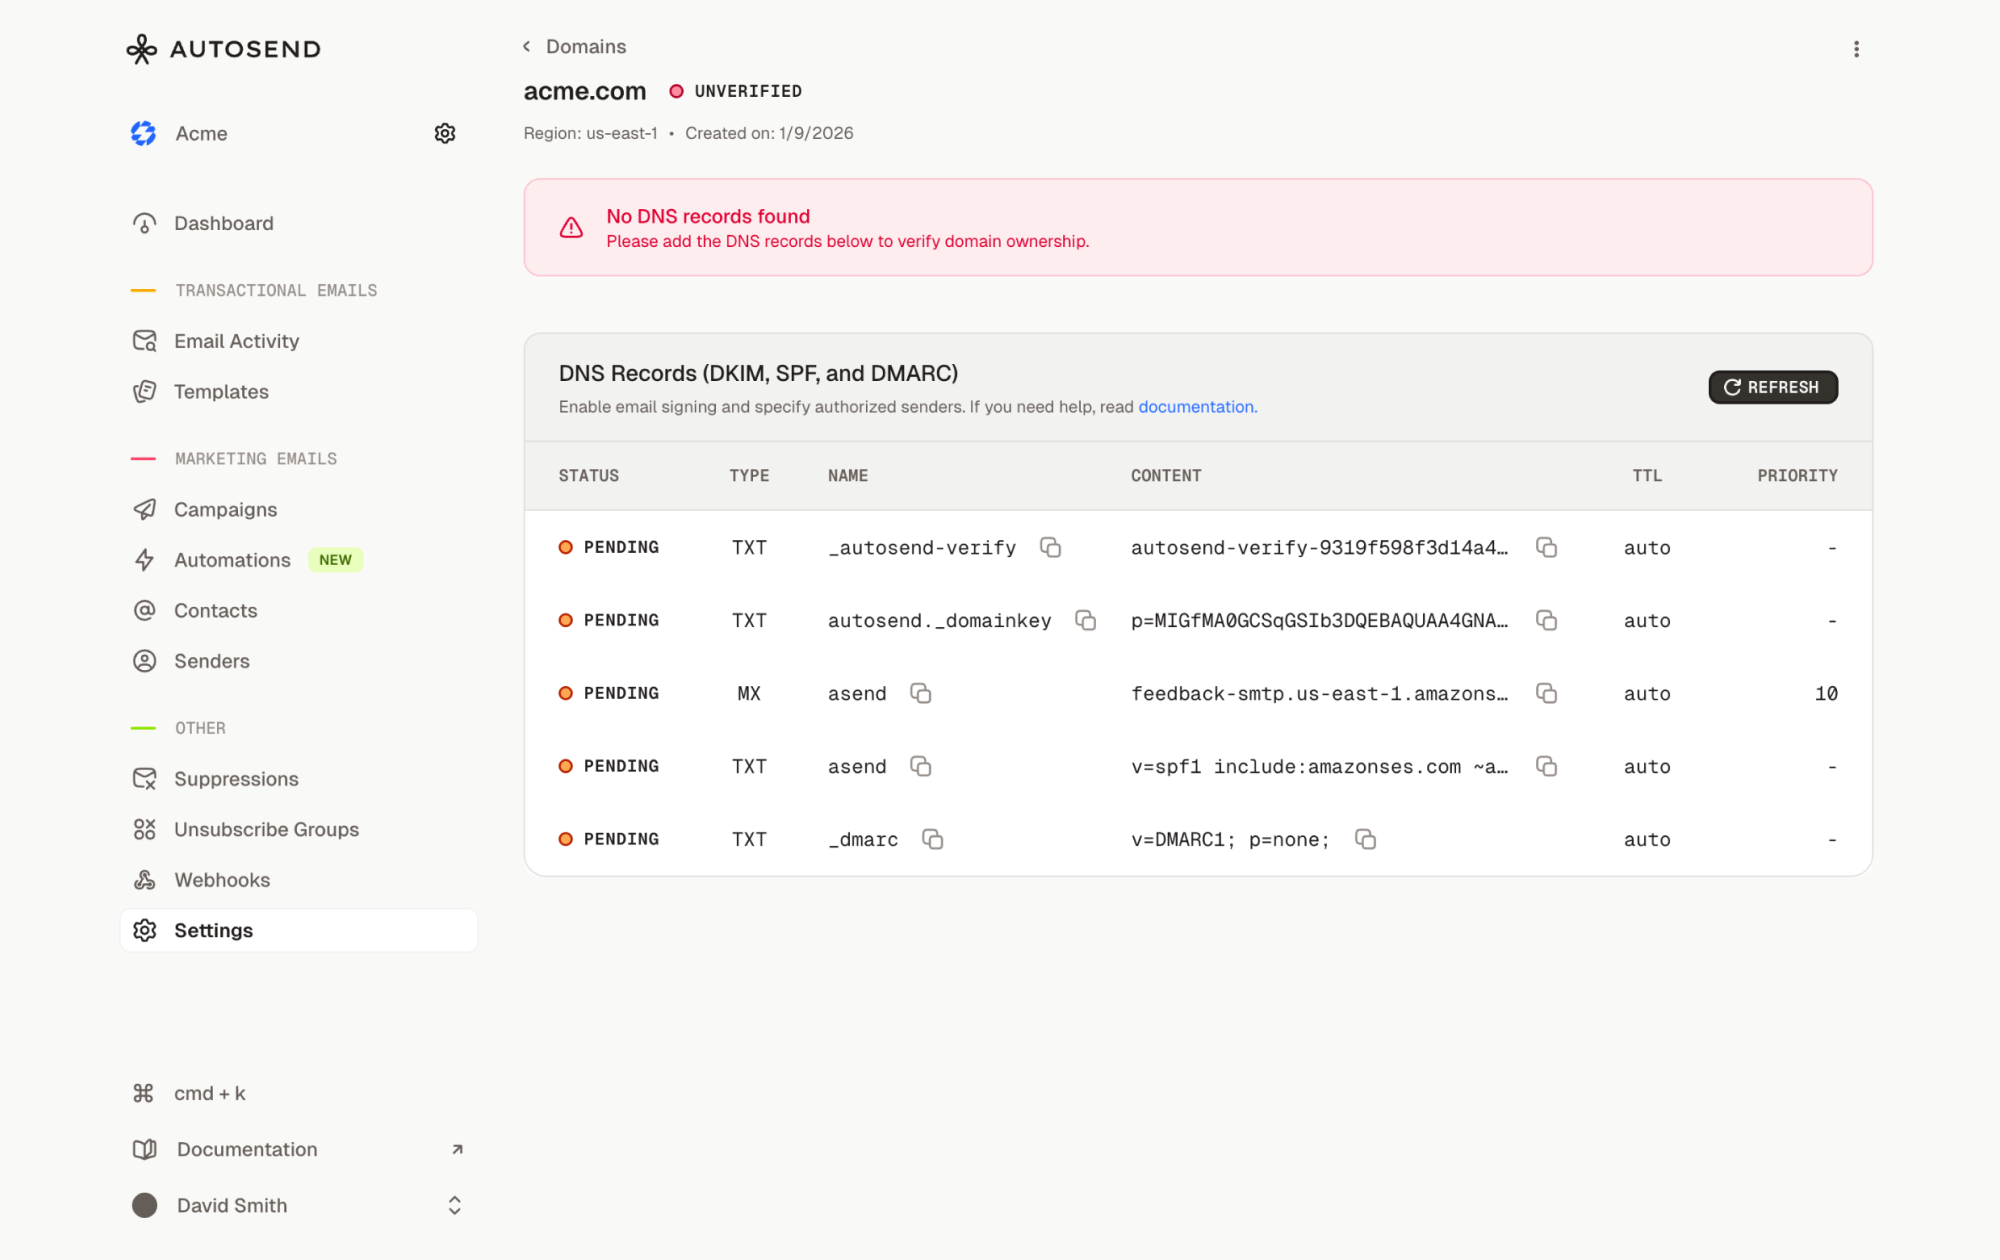 Each record will have the following fields:
| **Field** | **Description** |
| ----------------- | -------------------------------------------- |
| **Type** | DNS record type (CNAME or TXT) |
| **Name** | The subdomain or host record |
| **Content/Value** | The record value to add |
| **Priority** | Used for MX records (usually not applicable) |
| **TTL** | Time To Live - set to “Auto” or 3600 |
**Note** - Copy the exact values from AutoSend - even small typos can cause verification to fail -
Some DNS providers add your domain name automatically - check your provider’s documentation - Use
the copy button next to each record value in AutoSend to avoid errors - All DKIM and SPF records
must be added for successful verification
After adding all DNS records to your DNS provider:
1. **Wait for DNS propagation** (typically 5-30 minutes, but can take up to 48 hours)
2. Navigate back to your domain details page in AutoSend
3. Click the **“Verify Ownership”** or **“Check Verification”** button
### Verification Statuses
Your domain will progress through these statuses:
| **Status** | **Badge Color** | **Description** | **Action Required** |
| ----------------------- | --------------- | ------------------------------------------- | ------------------------------------------- |
| **Unverified** | Red | No DNS records found | Add DNS records to your provider |
| **Pending** | Orange | DNS records found, verification in progress | Wait for DNS propagation (5 mins - 2 hours) |
| **Verified** | Green | Domain fully verified and ready to use | None - you can start sending! |
| **Verification Failed** | Red | DNS records incorrect or missing | Check your DNS records and try again |
Each record will have the following fields:
| **Field** | **Description** |
| ----------------- | -------------------------------------------- |
| **Type** | DNS record type (CNAME or TXT) |
| **Name** | The subdomain or host record |
| **Content/Value** | The record value to add |
| **Priority** | Used for MX records (usually not applicable) |
| **TTL** | Time To Live - set to “Auto” or 3600 |
**Note** - Copy the exact values from AutoSend - even small typos can cause verification to fail -
Some DNS providers add your domain name automatically - check your provider’s documentation - Use
the copy button next to each record value in AutoSend to avoid errors - All DKIM and SPF records
must be added for successful verification
After adding all DNS records to your DNS provider:
1. **Wait for DNS propagation** (typically 5-30 minutes, but can take up to 48 hours)
2. Navigate back to your domain details page in AutoSend
3. Click the **“Verify Ownership”** or **“Check Verification”** button
### Verification Statuses
Your domain will progress through these statuses:
| **Status** | **Badge Color** | **Description** | **Action Required** |
| ----------------------- | --------------- | ------------------------------------------- | ------------------------------------------- |
| **Unverified** | Red | No DNS records found | Add DNS records to your provider |
| **Pending** | Orange | DNS records found, verification in progress | Wait for DNS propagation (5 mins - 2 hours) |
| **Verified** | Green | Domain fully verified and ready to use | None - you can start sending! |
| **Verification Failed** | Red | DNS records incorrect or missing | Check your DNS records and try again |
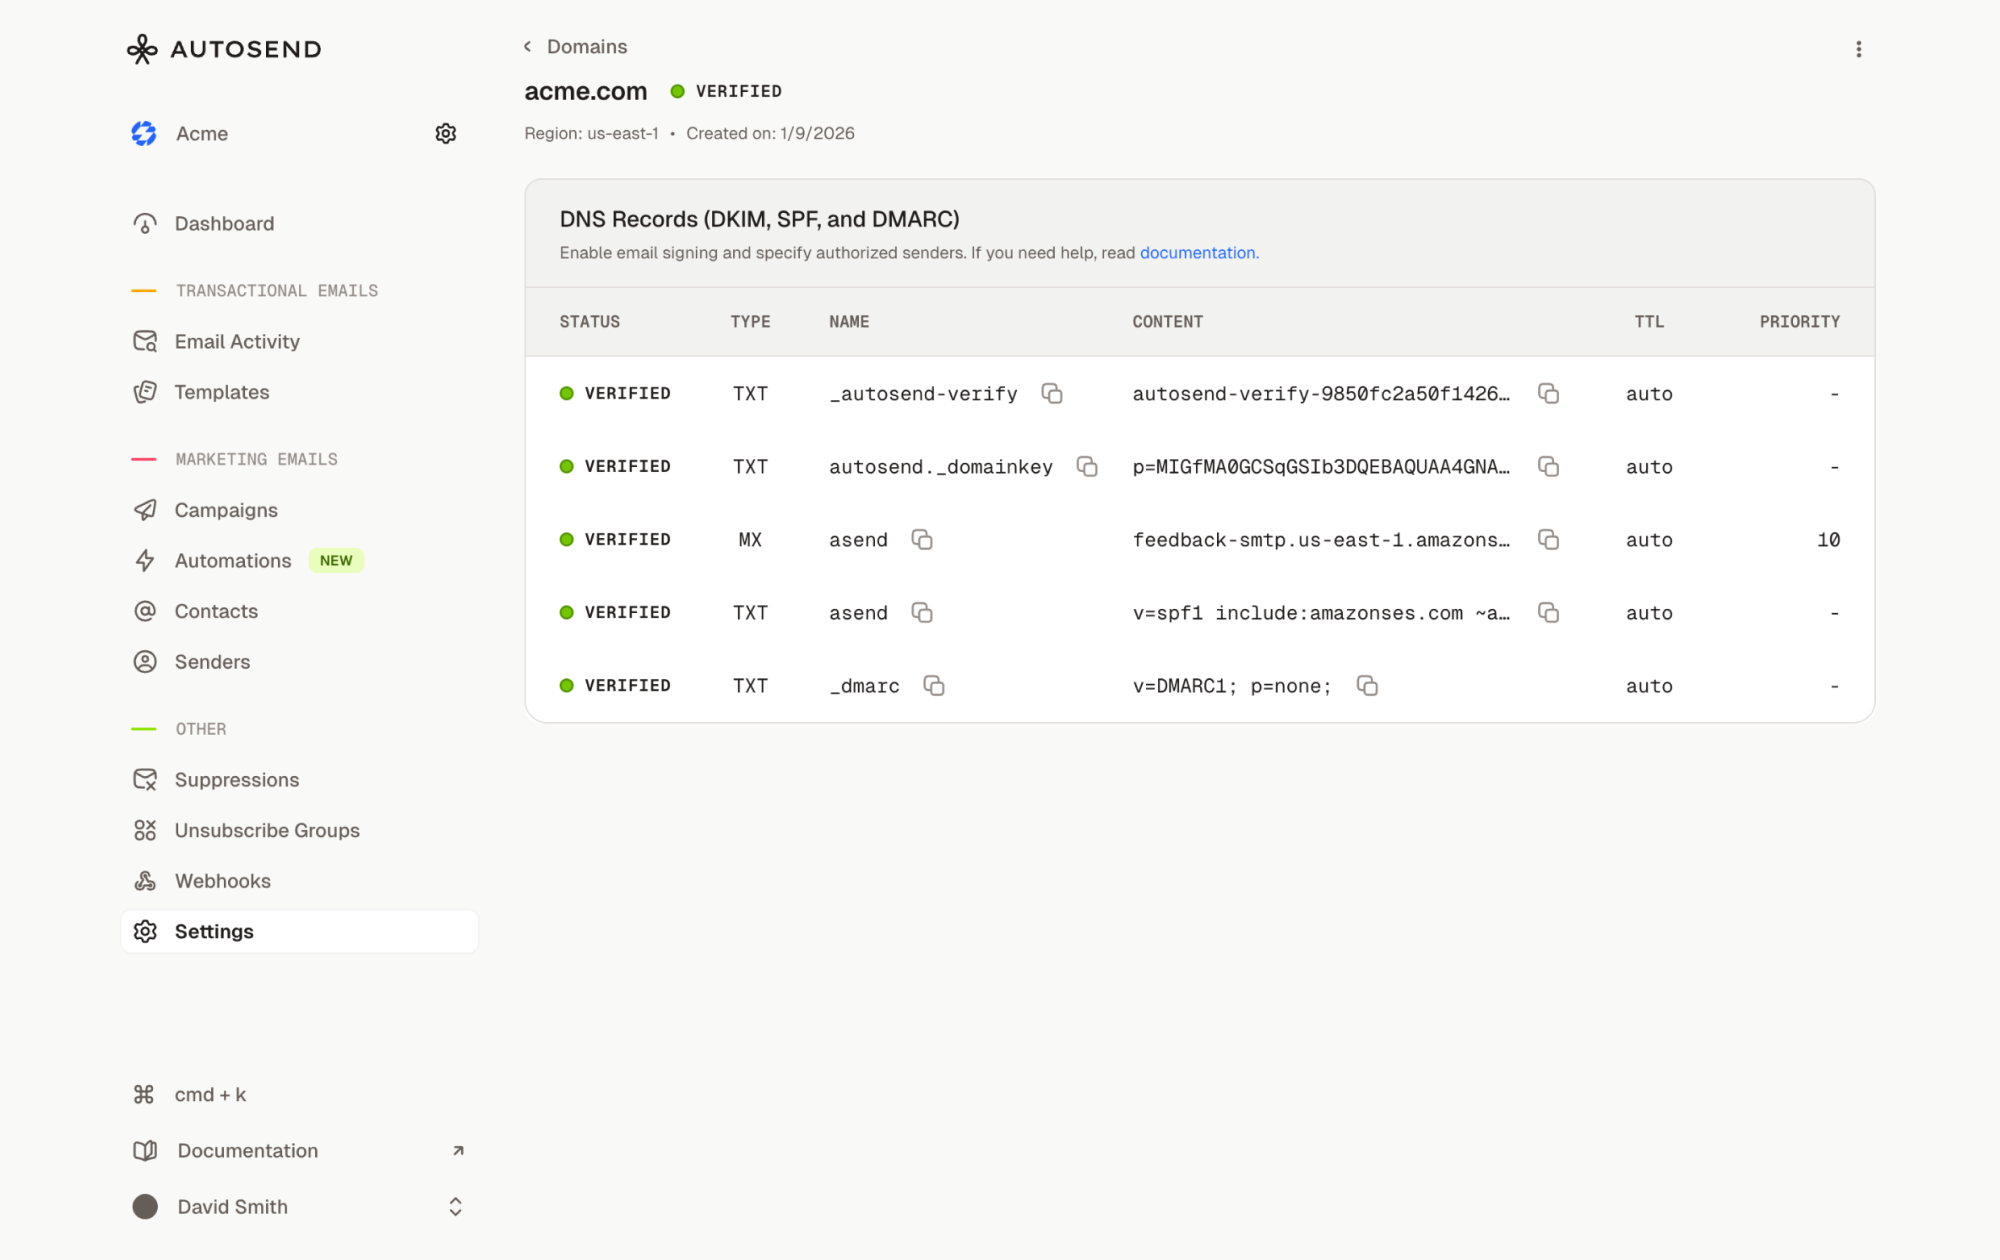 When your domain shows a green “Verified” badge, you’re all set! You can now use this domain to
send emails through AutoSend’s API.
## Next Step: Warm Up Your Domain
If you're sending marketing emails, we strongly recommend warming up your new domain before sending to your full list. This builds sender reputation and improves deliverability.
Read our Domain Warmup Guide to learn how.
**New domains are limited to 300 emails/day.** Since your domain is new, sending too many emails too quickly can hurt your deliverability and trigger spam filters. This limit also protects against unauthorized use. As your domain builds a sending reputation, the limit will be lifted automatically - or you can reach out to {SUPPORT_EMAIL} to request an early removal.
## Troubleshooting
### Domain Not verifying?
If your domain verification is stuck or failing, try these steps:
DNS changes can take time to propagate globally. Use a DNS checker tool to verify your records are visible:
*
DNS Checker
*
WhatsMyDNS
Enter your domain and check if the records appear globally.
* Ensure you copied the **exact** values from AutoSend (including any underscores or periods) -
Check for extra spaces or hidden characters - Verify the record **Type** is correct (CNAME vs TXT)
Some DNS providers automatically append your domain name to records. For example:
* AutoSend shows: `_amazonses.mail.yourdomain.com`
* Your provider might only need: `_amazonses.mail` or `_amazonses`
Check your provider's documentation for the correct format.
DNS propagation typically takes:
* **5-30 minutes** for most providers
* **Up to 2 hours** for some providers
* **Up to 48 hours** in rare cases
Be patient and try verifying again after waiting.
If records still aren't working:
1. Delete all AutoSend-related DNS records
2. Wait 10-15 minutes
3. Re-add all records carefully
4. Wait for propagation
5. Try verification again
### Common DNS Provider Instructions
* Log in to Cloudflare dashboard
* Select your domain
* Go to **DNS** > **Records**
* Click **Add record**
* Set **Proxy status** to "DNS only" (gray cloud)
* Log in to GoDaddy
* Go to **My Products** > **DNS**
* Click **Add** to create new records
* Note: GoDaddy auto-appends your domain
* Log in to Namecheap
* Go to **Domain List** > **Manage**
* Go to **Advanced DNS** tab
* Click **Add New Record**
* Open Route53 console
* Select your hosted zone
* Click **Create Record**
* Use simple routing
When your domain shows a green “Verified” badge, you’re all set! You can now use this domain to
send emails through AutoSend’s API.
## Next Step: Warm Up Your Domain
If you're sending marketing emails, we strongly recommend warming up your new domain before sending to your full list. This builds sender reputation and improves deliverability.
Read our Domain Warmup Guide to learn how.
**New domains are limited to 300 emails/day.** Since your domain is new, sending too many emails too quickly can hurt your deliverability and trigger spam filters. This limit also protects against unauthorized use. As your domain builds a sending reputation, the limit will be lifted automatically - or you can reach out to {SUPPORT_EMAIL} to request an early removal.
## Troubleshooting
### Domain Not verifying?
If your domain verification is stuck or failing, try these steps:
DNS changes can take time to propagate globally. Use a DNS checker tool to verify your records are visible:
*
DNS Checker
*
WhatsMyDNS
Enter your domain and check if the records appear globally.
* Ensure you copied the **exact** values from AutoSend (including any underscores or periods) -
Check for extra spaces or hidden characters - Verify the record **Type** is correct (CNAME vs TXT)
Some DNS providers automatically append your domain name to records. For example:
* AutoSend shows: `_amazonses.mail.yourdomain.com`
* Your provider might only need: `_amazonses.mail` or `_amazonses`
Check your provider's documentation for the correct format.
DNS propagation typically takes:
* **5-30 minutes** for most providers
* **Up to 2 hours** for some providers
* **Up to 48 hours** in rare cases
Be patient and try verifying again after waiting.
If records still aren't working:
1. Delete all AutoSend-related DNS records
2. Wait 10-15 minutes
3. Re-add all records carefully
4. Wait for propagation
5. Try verification again
### Common DNS Provider Instructions
* Log in to Cloudflare dashboard
* Select your domain
* Go to **DNS** > **Records**
* Click **Add record**
* Set **Proxy status** to "DNS only" (gray cloud)
* Log in to GoDaddy
* Go to **My Products** > **DNS**
* Click **Add** to create new records
* Note: GoDaddy auto-appends your domain
* Log in to Namecheap
* Go to **Domain List** > **Manage**
* Go to **Advanced DNS** tab
* Click **Add New Record**
* Open Route53 console
* Select your hosted zone
* Click **Create Record**
* Use simple routing